Saturday, May 25, 2013

My Big Brother

Ever since I can remember, my big brother has always been there.  Being a second child in a family of four, I never knew what it was to be alone.  There was always someone to watch and learn what was coming next whether it be with teachers in school, standardized testing, or general life events.  Throughout all of my years, I became known as Jonathan Peeples little sister, and this was a name I felt like I had to live up to.  


For example, when we were kids, Jonathan loved the movie, The Hobbit, so naturally, I loved The Hobbit.  In lower elementary school, Jonathan had an amazing memory and for school, learned by heart the longest poems in our book, like the Jabberwocky and You Are Old Father William.  I was not as skilled in this area, but I tried my darndest.  In upper elementary, Jonathan loved playing baseball, so I signed up for softball.  In high school, Jonathan loved going to see bands, so I wanted to go to the shows too.  I tried to live up to my nickname by being as smart, witty, and well-rounded as my brother.

Recently, our family is moving into a new phase of our lives.  Jonathan graduated from medical school, and if this wasn't enough of a change, he is moving to New Hampshire to complete his residency at Dartmouth.  Now, we kids have moved out of the house to go to college, but we always knew we would be back.  None of us have ever lived more than a few hours away.  None of us has ever missed a major holiday with the family.  None of us has ever graduated from a professional school before.  I feel like when Rachel has to move out when Chandler and Monica decide to move in together.  (If you have no idea what I am talking about, shame on you!)  


It's like the end of an era!!


Although these last few weeks before Jonathan moves are bittersweet, I can't help but express the fact, that I am so proud of my big brother and all that he has accomplished.  I know that he has many more great things to come.  All that I have left to say is that I love you and will miss you terribly!

Monday, May 20, 2013

Pistachio Chicken

With swimsuit season looming before us, several of my friends have decided to prepare by living the low-carb lifestyle.  It got me thinking about some really healthy, energy-rich foods and this recipe popped into my head.  I got it from my Mom, and trust me, it is so full of flavor you won't even notice the bread is missing from the table.  

Pistachios have so many health benefits, from lowering your LDLs (bad cholesterol) to making your skin glow.  They are loaded with vitamin B6 which aids in blood health, nervous, and immune systems.  They also are chock full of carotenoids that are known to decrease risk of macular degeneration.  There is really no reason to not eat pistachios, so drumroll, please.  This is my mom's Pistachio Chicken.

Pistachio Chicken


As the name states, the ingredients are pistachios... and chicken.  I served mine with some roasted potatoes and a spinach salad, but if you are low-carbing it, this would make a delicious chicken salad.


This recipe makes 2 servings, but you can easily double or triple the recipe if you need to.  Take 1/2 cup of shelled pistachios and place them in a food processor.  I buy the pistachios from Sams already shelled, making this recipe so quick.


Pulse the nuts until they are coarse.  Meanwhile, preheat your oven to 350 degrees.


Take one chicken breast, cut it in half so that you have 2 chicken cutlets.  Pound out the cutlets until they are about 1/2 inch thick.  Press the cutlets into the pistachio crumbs.


Heat a pan with a splash of olive oil to medium-high heat.  Cook the chicken breast for a few minutes on one side, and flip it to cook the other side for a minute or two.  Remove the cutlets from the pan and place them in a small casserole dish.  Finish cooking the chicken in the oven for another 10 minutes.


Pistachio chicken is so unbelievably flavorful and juicy.  The nuts get toasty and crunchy.  There is only one more thing to say: Get Crackin'!


Saturday, May 18, 2013

Sage: An Herb a Day

 We have reached the end of my herb week.  I decided to finish with a very simple recipe that hits all the right flavor notes and is very comforting.  Since this was my last recipe in this blog series, I wanted to celebrate by having some special friends over to share this meal with us.  The food was delicious, but the company was even better.  This is my Sage Butternut Squash Bake.

Sage Butternut Squash Bake 


Look at those scrumptious pieces of sausage, velvety chunks of butternut squash with verdant flecks of sage mixed throughout!  If you haven't noticed, I have been helping Matt with his GRE vocabulary flashcards.


Take a 2lb butternut squash, peel it and remove the seeds.  I have found that this is easier to do with the straightest squash you can find.  Cut the squash into cubes and place on a baking sheet with 1 TBSP  of olive oil, salt, and pepper.  Roast at 400 degrees for 20 minutes, toss, and cook for another 15 minutes.


They turned out so crunchy and golden on the outside with a creamy texture on the inside.


I took 1lb of mild pork sausage and browned it


 In a separate pan, I melted 1 TBSP of butter


 I then added 1/2 cup of chopped walnuts and 5 sage leaves.  Sage goes so so well with butternut squash.  I don't know what it is that makes it so good, but it is a fantastic combination.

Lastly, I mixed all of the ingredients together, and... that's it!  Super simple and yet so delectable.  Thanks, Will and Whitney for such a fun dinner.  Y'all are such wonderful friends, and we will have to do it again soon!


Friday, May 17, 2013

Rosemary: An Herb a Day

Yessssssss!  Rosemary, probably my favorite and most used herb.  I have previously posted about my Rosemary Turkey burgers, which in my opinion is the only way to eat a burger.  If you want to check out this recipe, the link is http://forthereyourheartwillbe.blogspot.com/2012/11/rosemary-turkey-burgers.html.  But today, I decided to try something different.  

Rosemary is so woody and earthy.  It is the heartiest of all of my herb family.  It reminds me slightly of pine, which makes me think of the woods, which makes me think of hunting, which makes me think of deer meat.  Great!  Glad we are on the same page.  This is my Rosemary Stuffed Deer Tenderloin (which can definitely be substituted by beef tenderloin).

Rosemary Stuffed Deer Tenderloin


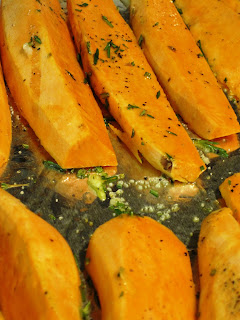
This is the final product, and the flavors were to die for.  As a side dish, I served roasted sweet potato wedges sprinkled with salt, pepper, and rosemary, of course!


With my meat, I took the tenderloin and cut the top third of the meat horizontally, but not all the way through.  I laid that open and cut horizontally from the middle of the bottom two thirds but not all the way through.  Basically, cut your meat to make it as thin and long as possible.  Sprinkle both sides with salt and pepper.


Now it is time to prepare the stuffing.  I used 1/2 a box of chicken stuffing mix, 2 packed cups of spinach, 1/2 cup of dried cranberries, and 2 sprigs of rosemary.


Chop up that foresty goodness


Put a dab of olive oil in a pan and allow the spinach to wilt and the cranberries to plump up, approximately 5 minutes.


Add half of the box of stuffing mix into the pan and stir in 1/2 cup of red wine (just whatever you have lying around is fine).  


Once the stuffing mix has softened, lay it over the meat and roll the it up.  Tie the meat to keep the stuffing from falling out.  Sprinkle the tenderloin with salt, pepper, and drizzle it with olive oil.


Yummy!  I can't wait.  Place the meat in a 350 degree oven for about 20 minutes.  You want the meat to be cooked to the center, but not dried out.


While the meat is in the oven, lets start on the sweet potatoes!  Peel the sweet potatoes, and cut into wedges.  Mince 2 cloves of garlic, along with 1 sprig of rosemary.


Drizzle the wedges with 1-2 TBSP of olive oil and sprinkle with rosemary, garlic, salt, and pepper.


These sweet potatoes are so delicious.  I am unfortunately not a huge sweet potato fan.  I really, really want to be because they are so much better for you than regular russet potatoes, but these sweet potatoes are the perfect complement for this rustic dish.


Are you drooling yet?  My Matty is a meat and potatoes kind of guy, so this meal was right up his alley.  Feed this to your manly man, and he will love you forever.

Thursday, May 16, 2013

Dill: An Herb a Day

Oh dill, what do I do with you?  When I think of dill, I think of flavorless salmon sitting next to some type of dill and cream cheese mixture or a mayonnaise based potato salad with flies buzzing around it.  Nevertheless, I bought a dill plant earlier this year, and it has grown like crazy.  So here we are, lots of dill and very few good memories of recipes including dill.

I hate to start out this post on such a negative note, but I am afraid the negativity continues.  I really do not like pickles...I mean, it is such a weird food.  It's like a vegetable, with vinegar, and mysterious things floating in a jar?  With this said, when I think of the epitome of southern women, I think of a woman in a big, floppy hat that picks food from her garden and knows her way around a mason jar.  With all the negativity aside, I decided to create my own dill pickles.

Homemade Dill Pickles


I paired these crunchy, briney guys with a refreshing grilled chicken sandwich and baked fries.  It was a fantastic meal and my sweet husband was showing off his "gourmet" lunch the next day at work.


The key players: Distilled white vinegar, garlic, red chili flakes, salt, sugar, cucumbers, and of course, dill


I used my mandoline to cut these beautiful, wavy cucumber chips, but you could easily use a knife to cut 1/4 inch slices.  I bought 4 small cucumbers from the grocery store, and it made the perfect amount of chips.


In a small pot, add 1 cup of water, 1 cup of vinegar, 2 cloves of garlic minced, 1 TBSP of salt, 1 TBSP of sugar, and a pinch of red chili flakes.  Heat and stir until salt and sugar are dissolved.  
I knew we would never be able  to eat all of these pickles, so I separated the cucumbers in half to give to a friend, namely, my momma.  I roughly chopped 1/2 cup of dill fronds and placed over the cucumbers.


I poured half of the warm vinegar mixture over each of the cucumber batches, covered the pickles, and let marinate in the fridge for a few hours.


Mmm... the final product was so much more than I expected.  Basically, to compare store-bought pickles to fresh pickles is like comparing jarred applesauce to a fresh honey-crisp apple.  Fresh pickles are just on a whole 'nother level.  The pickles are crunchier, the dill flavor is not overpowering, and the garlic really shines.


As soon as we have a yard, I plan on planting a garden and officially entering the True Southern Women's Club.  Until then, I will bask in my G.R.I.T.S. status (Girl Raised In the South).

Wednesday, May 15, 2013

Tarragon: An Herb a Day

Tarragon is one of those herbs that isn't as well known as say, basil, parsley, or cilantro, but it is really beautiful and a little bit goes a long way.  When I was thinking about how to use tarragon, I really wanted to try to create something completely new.  I was a little nervous making this dish because we were eating with friends and it was brand new to me.  But it turned out fantastic and was really delicious.  This is Tarragon Chicken and Dumplings:

Tarragon Chicken and Dumplings


Take a few sprigs of tarragon and strip them of the leaves.  Chop the leaves finely.


All you need to know about making dumplings is that it is really similar to making biscuit dough.  In fact, I have even used canned Pillsbury biscuits as dumplings in the past.  Although that is incredibly simple, the dumpling recipe I am sharing is super light and makes a fluffy, flavorful dumpling.  

In a bowl, combine 1 cup of all purpose flour, 1 tsp of salt, 1/2 tsp of black pepper, and the tarragon.


To the bowl, add 2 TBSP of melted unsalted butter and stir the mixture to create a crumbly consistency.


Add 1/2 cup of warm water and stir until the dough has just come together.  Tip: the less you work the dough, the fluffier the dumpling will be!


Set the dough aside and chop 4 carrots, 1 stalk of celery, and 1 medium onion.  Add veggies to a medium-high heat dutch oven with 1 TBSP of olive oil preheated.  Saute the vegetables and add a pinch of salt and pepper.


After a veggies begin to soften, add 2 diced uncooked chicken breasts and heat through until the chicken has become white on all sides, but not completely cooked through.  Add the zest of one lemon, 1 bay leaf, and 4 cups of chicken stock.  At this point, I also added 1 tsp of ground black pepper, but that is optional.


While the soupiness comes together and the chicken is cooking through, flatten out your dumplings and cut into squares.  I like cutting them small because they really puff up...like really puff up.  


Add the dumplings to the soup.  Woah! So fluffy!!!  Cover the chicken and dumplings with the lid and simmer for about 20 minutes.  The flour in the dumplings will thicken the soup and you will have a wonderfully, comforting bowl of goodness.


In the last few minutes of cooking, add 1/2 a cup of frozen peas and remove the bay leaf.  Allow the peas to heat through and devour.  The tarragon and the lemon zest add this really fresh flavor that brings out the veggies, and the pepper adds a zing that will leave you wanting more and more and more!  I hope you enjoy this recipe as much as we did.

Ingredients
1 cup of flour
2 tbsp of chopped tarragon
2 tbsp of melted unsalted butter
1/2 cup of water
1 tbsp of olive oil
4 carrots peeled and diced
1 stalk of celery, diced
1 medium onion, diced
2 chicken breasts uncooked
4 cups of chicken stock
zest of 1 lemon
1 bay leaf
1/2 cup of frozen english peas
salt and pepper

Directions
In a medium bowl, combine the flour, salt, pepper, tarragon, and butter.  Add the water and mix until just combined.

Heat a dutch oven over medium-high heat.  Add 1 TBSP of olive oil.  Dice carrots, onion, and celery and add it to the pan.  Cook until softened, about 5 minutes.  Add the diced, raw chicken and cook for about 5 minutes.  Add the chicken stock, lemon zest, and bay leaf.

Pat out the dumpling dough and cut into squares.  Add the dumplings to the chicken broth and allow the soup to simmer covered for 20 minutes.  Add the peas and heat through.

Monday, May 13, 2013

Thyme: An Herb a Day

It's thyme for date night!  Sorry, I had to get that out of my system.  Being newly married with school loans constantly looming over our heads, Matt and I try to save money by doing date nights in... Actually, I just love cooking, and it just so happens to help out in the financial area, but whatever helps.  I will take one for the team.  I am always trying to create fancy looking dishes that are inexpensive.  I have learned over the past two years through my cooking endeavors that using expensive ingredients is not the most important part of having a delicious meal.  It is all about cooking the ingredients well.

For date night in, I dreamed up a recipe I affectionately call, Rustic Thyme Meatloaf.  It is beautiful not because of perfectly placed grill marks or the money invested in creating it.  It is beautiful due to a little thoughtful planning and its bright colors.

Rustic Thyme Meatloaf


Ingredients:
1 lb of ground beef or deer
10 Ritz crackers, crushed into crumbs
1 egg
3 TBSP of thyme leaves
1/2 14oz can of petite diced tomatoes
Worchestershire sauce
4 peeled carrots
2 TBSP of olive oil
1 TBSP of flour
1 garlic clove
Balsamic vinegar
Red wine
Chicken broth 
Salt and Pepper

Directions:
Preheat the oven to 375 degrees.  In a bowl, mix 2 tbsp of thyme leaves, ground meat, egg, tomatoes, and crushed crackers.  Form the mixture into individual patties and place on a baking sheet.  Drizzle each meatloaf with Worchestershire sauce.  Put the patties in the oven and bake for 30 minutes.

While the meatloaf is cooking, take your carrots and slice them in thin, long strips.  I used a mandoline to get this effect, but I know not everyone has one of these.  Instead, you can use your vegetable peeler to make strips.  Heat a skillet over medium high heat with 1 tbsp of olive oil and salt and pepper.  Place your carrot ribbons in the pan and saute until they are soft and droopy.  For me it took about 10 minutes, but if you used your vegetable peeler, they will cook faster.

While your carrots are softening, it is thyme to whip up a quick sauce.  (I couldn't help myself).  Thinly slice your garlic clove.  Take the other tablespoon of olive oil, heat over medium heat and add the flour and stir.  When the oil and flour have come together add the garlic slices.  Here is where things get tricky.  I didn't measure how much liquid I added, but here are my closest guesses.  Add 1/2 a cup of chicken broth and wisk the mixture until the sauce thickens.  Add a dash of worchestershire sauce and balsamic vinegar.  Let sauce thicken and finally add 1/4 cup of red wine and a pinch of salt and pepper to taste.

Presentation is what changes an ordinary dish from restaurant quality deliciousness.   Place one meatloaf on a plate and drizzle with your garlic wine sauce.  Top your meatloaf with the beautiful carrot ribbons and sprinkle with some of the remaining thyme leaves.  I served my meatloaf with steamed broccoli, but I seriously debated serving it with mashed garlic potatoes.  I still think the potatoes would be a fantastic idea, but to cut back on calories, I made the adult decision to have broccoli.  The child in me was very sad to miss out on the carbs.

Light a candle, grab your sweetie, and enjoy spending thyme together on your date night in.  Okay, enough puns for today.  Bon Appetite! 


Friday, May 10, 2013

Oregano: An Herb a Day

Oregano...what is so special about oregano?  It is a deeply overshadowed herb.  It is basically a weed that I would suggest planting in a pot unless you want an entire flower bed of oregano.  It is hearty and lives straight through the frosts and the freezes of the winter...at least it does in Mississippi.  It is the herb that is in practically every tomato sauce whether it be for pasta, pizza, or dipping.  

I chose to make a rich and fulfilling pasta dish that is full of flavor and not too hefty on the calories.  I wouldn't say this recipe is healthy, but it is packed with veggies and protein.  This is my Oregano Pasta Bake.

Oregano Pasta Bake


Ingredients:

4 cloves of garlic
1 small onion
1 small eggplant
1 14 oz can of whole tomatoes
1 TBSP of olive oil
Salt and Pepper
1 14 oz can of crushed tomatoes
Juice of 1/2 a lemon
1/2 cup of fresh oregano leaves
8 oz of whole wheat tube shaped pasta
1 lb of lean ground beef
1/2 cup of parmesan cheese
1 slice of multigrain wheat bread drizzled with olive oil

Directions:
Preheat your oven to 400 degrees.  Cut the onion into chunks and place on a lined cookie sheet.  Cut off the top of the eggplant and slice in half.  Place it on the cookie sheet cut side up.  Dump the can of whole tomatoes and 4 garlic cloves on the cookie sheet as well.  Drizzle with olive oil and sprinkle with salt and pepper.  Roast in the oven for 30-40 minutes.

While the veggies are cooking, brown the ground meat and drain it of any excess fat.  Cook your pasta according to the box's instructions.  Err on the side of less done pasta because we are going to be baking it and the pasta will continue to cook in the oven.

In a blender place the oregano leaves, the lemon juice, and the can of crushed tomatoes.  When the vegetables are finished roasting, scoop the eggplant meat out of the skin and place it in the blender along with the other roasted vegetables.  Puree until smooth.

Toss the meat, pasta, and sauce together and pour into a baking dish.  Place the wheat bread in a food processor along with a drizzling of olive oil.  Pulse until you have bread crumbs.  Sprinkle the pasta with the parmesan cheese and bread crumbs.  Bake the pasta in the oven for 20 minutes or until the top has become a crispy brown color.


This dish was so yummy.  It hit all of the right notes from the sweetness of the tomatoes to the saltiness of the parmesan to the crunch of the breadcrumbs and the earthiness of the creamy vegetable sauce and ending with the satisfying protein.  I would highly recommend this recipe, especially if you are cooking for some picky eaters that don't like vegetables.  I won't tell them eggplant is in it if you don't!

Tuesday, May 7, 2013

Basil: An Herb a Day

In my previous post, I mentioned my herbs that I had planted for the spring.  Now that they have taken root, I decided to utilize one herb every night for a week and create a recipe that really makes that specific herb shine.  I decided to start easy with basil, the popular kid in my school of herbs.  My mind initially jumped to pesto.  I love pesto.  Love, love, LOVE pesto, but I realized I wasn't really thinking outside of the box.  I thought about a caprese salad, which is one of my favorite salads for this time of year: tomatoes, mozzarella  basil, balsamic.  What's not to love?

I went back and forth, debating what I was going to chose for my lovely, sweet basil.  I eventually decided to do it simple, and do it right: Tomato Basil Grilled Cheese.  Food cannot get more comforting or more simple than a grilled cheese.  I also knew we were having some special friends for dinner and there was a slim-to-none chance that I could screw up a grilled cheese.  Here's how I did it.

Tomato Basil Grilled Cheese


Ingredients:
4 vine ripened tomatoes
1/2 lb of good mozzarella cheese
1/4 cup of basil
2 TBSP of butter
1 loaf of wheat multigrain bread
salt and pepper

Directions:
Heat a grill pan or skillet to medium high.  Grease pan with butter or non-stick spray.  Slather butter on one side of each slice of the multigrain bread (enough for four sandwiches).  Set aside.

Cut each tomato into four slices.  I used gold tomatoes and red tomatoes because they were so beautiful in the store, but any color would work just fine.  Seed your tomatoes to rid yourself of excess juice, and pat the tomatoes dry with a paper towel.  Soggy bread can really be a Debbie Downer at a grilled cheese party.  Sprinkle the slices with salt and pepper.

Wash and dry your basil leaves.  Grab your mozzarella from the fridge and slice 1/2lb of it.  I have been getting my mozzarella from Sam's where they have 2lbs of fresh mozzarella for around $6.00!  You can't buy two pounds of the mozzarella processed cheese for that price.  It is definitely worth it.  

Now it is time to assemble all of your goodies.  I layered a few basil leaves on the non-buttered side of four slices of bread.  On top of this I placed my tomatoes (two yellow slices and two red slices), and finally, the delicious mozzarella.  With precious care, I laid the top slice of bread over my lovely sandwich, and gingerly slid them onto the hot griddle.

When the bread becomes tan and crispy, flip that baby.  Once the cheese gets to that ooey, gooey, goodness stage, and you know the stage I am talking about, remove them from the grill.  Cut the sandwiches into triangles and serve immediately.

We had a fantastic time with our dinner guests, and I am pretty sure my cheeks hurt from laughing as much as I did.  I am so glad we had some sweet friends to share this sweet basil meal with us.