Tuesday, July 28, 2015

Hershey Bar Pie

Yay!! Dessert blog!!  Let me give you a little insight into my soul.  I am and will always be a girl that craves salty food.  My weaknesses are as follows: popcorn, chips, and french fries.  Don't get me wrong; I do enjoy the occasional sweet thing, but it is not what drives me to eat.  Please do not hate me.  I know what I just confessed is not a popular opinion, which brings me to my dear, sweet-toothed husband.  In Matt's world, he eats a small dinner, for sake of argument, lets call it an appetizer, so that he can be rewarded for eating all of his dinner by having a big dessert.

A typical dessert for Matt would be Oreos with a glass of milk, ice cream, or his favorite...pie.  My sweetie loves pie.  He loves talking about pie.  Well, of course, there is apple pie, then pumpkin pie, oh yes, and pecan pie, but, wait! don't forget about blueberry pie.  The list goes on and on.  He then asks me, "What pie is your favorite?"  I reply, "Chicken pot pie."  Matt then lets out a really long sigh, shakes his head, and says, "You just don't get it."

But in honor of my love, I decided to make a pie.  The pie recipe I am about to share with you is my favorite dessert pie in the world.  My mom only makes this pie on special occasions, so for all of these years, I believed it to be a labor intensive process.  I could not have been more wrong! It is only five ingredients, and easy as pie to make (see what I did there?).  This is my mom's Hershey Bar Pie.

Hershey Bar Pie


If you like chocolate, you are going to love this pie!  It only takes 5 ingredients: 1 graham cracker crust, 6 Hershey bars with almonds, 10 marshmallows, 1/2 cup of milk, and an 8 oz container of Cool Whip.


Take the marshmallows, and put them in a medium sized pan 


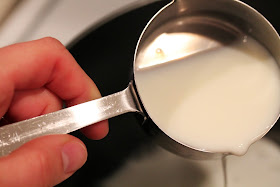
Add the 1/2 cup of milk


and lastly, the Hershey bars with almonds.  Turn the eye temperature to medium low heat.  This step is key to having a yummy pie.  If the pan gets too hot, the chocolate and the milk can burn.  The process of melting the chocolate and the marshmallows took about 15 minutes because I did not want to risk anything burning.


Once everything is melted, the mixture will look something like this.


The consistency will be slightly thinner than pudding and more like a cake batter.


Pour the chocolate into the prepared pie crust.  Try to stir the almonds around to evenly distribute.  I had a friend ask me if they could use chocolate bars without the almonds.  I am almost 100% positive that you can, but once the pie is "set," it is has the soft texture of pudding.  I think the almonds make the pie delicious by adding that crunchy, toasty, nutty texture, but feel free to buy regular Hershey bars.

Now, pop the pie in the fridge for at least an hour, preferably 2-3 hours.  Here's the fun part!  That spatula you used earlier is ready for you to lick it clean.  There is nothing raw in this pie, so no guilt on licking the spoon.  Trust me, you know you want to.


After the pie has cooled completely in the fridge, slather an 8oz container of Cool Whip over the top, and dish you up some Hershey Bar Pie.

Ingredients
1 prepared graham cracker crust
6 Hershey bars with almonds
10 Marshmallows
1/2 cup of milk
8oz container of Cool Whip

Directions

Unwrap your Hershey bars.  Heat a medium pan over medium low heat.  Add the marshmallows, milk, and Hershey bars to the pan.  Stir until everything is combined and melted, about 15 minutes.  Pour the chocolate mixture into the prepared crust and try to distribute the almonds evenly.  Place pie in the fridge for 2-3 hours or until cooled completely.  Use a spatula to slather the pie with the Cool Whip.  Enjoy!

Thursday, July 16, 2015

Portabella Pizzas

Do you ever feel like you are being watched?  Cause I do.  From the time that I come downstairs in the morning to the time I go to bed at night, I sense someone is watching me. If you have a pet, you may know this feeling.  As a matter of fact, as I was writing this sentence, I looked to see where my dog, Leyla, was, and she was standing in the doorway... just watching me type away.  I do not say this to make Leyla sound creepy; it is more sweet than anything.  She just turned a year old, and as she has grown, I have seen her mature from that awkward, adorable ball of fur to a loving and protective dog.  

Now, I know you are thinking, "Did I miss read the blog title?  You keep talking about your dog!  Where is the pizza?"  But, wait, I am getting there.  All Leyla ever wants is to be as close to Matt or me as possible.  When we are at the computer, she is at our feet; when we are watching TV, she is on the blanket next to us; when I am in the kitchen, she is standing under me.  Leyla asks for very little from us except for time.  This is one reason I try to make super quick meals during the week.  With us being gone all day, I know she wants to spend as much time with us as she can until we go to bed and do it all over again.  So, with that said, the meal I am sharing with you today is one of my new favorites.  It can be ready in 20 minutes tops!  This is my Portabello Pizza.

Portabella Pizza


Yes, I felt the stare.  This was Leyla's perch as she watched me make the Portabella Pizzas.


The first things first, I apologize for my excessive use of the Vignette setting.  It seems I went a little overboard.  I was trying a few new settings on my camera and the tweaking has just started!  Oh, and yes, the blog looks different.  It was time for a re-vamp!

Okay, now we can talk food.  The first thing you need are portabella mushrooms.  I used three medium sized caps for two servings.  Wipe the caps with a damp paper towel to remove any grit.


Carefully remove the stems and the gills.  I say carefully because I was not, and one of my mushrooms broke in half.  Eh... no big deal if it happens, but when they are whole, it keeps the pizza sauce in place and not on the grates of your grill.  I just shrug my shoulders and contribute the mushroom breaking to my inhuman strength.


Drizzle the caps with olive oil and sprinkle with salt and pepper


Perhaps I should have mentioned this first.  Preheat your grill to medium heat about 350 degrees.  It should only take a few minutes.


Place your mushrooms on the grill, with the caps facing up.  In doing so, the edges of the mushroom get that charry, grill-marky flavor that we know and love so much.  Close your grill and allow to cook for 4-5 minutes.


While the mushrooms are cooking, cube 1/2-3/4 lb of fresh mozzarella.  In my opinion, I love the flavor of fresh mozzarella so much more than the shredded bag variety, but then again, the shredded bag variety has a lower moisture content and holds everything together nicely.  So, ultimately, your call!  I also have about 1/3 bag of turkey pepperoni and an almost empty jar of pizza sauce.  Collect your pepperoni, cheese, and sauce and take them out to the grill.


The mushrooms are ready to flip


OOOHHH....AHHHH.  Perfect!  The mushrooms are not entirely cooked through, but they are softened and charry on the edges.


Add your desired amount of pizza sauce to the mushroom caps


Add 1/2 of your cheese


Add a layer of pepperoni over the first layer of cheese, then add the rest of the cheese over the pepperoni.  The cheese's purpose, besides being amazingly delicious, is to help hold everything together.  It is equivalent to food glue... white, stringy, creamy glue.  Just a disclaimer, I never ate actual glue... that I can remember.


Close the grill and let everything heat through, about 5 minutes.  When you open the grill, the mushrooms will be perfectly cooked, the cheese will be all kinds of melty, and the pepperoni will have those crispy edges that make it so yummy.


Next, grab a sprig of basil for a garnish.  Btw, my basil is grown in one of those pallet planters that is hanging on our patio wall.  Matt made them last summer and the herbs love it!!  I do too!


Remove the pizzas from the grill


Stack your basil leaves on top of each other and roll them tightly like a cigar (that's what they always say on Food Network... why can't it be compared to something tasty like a Fruit Roll Up or something?)


Cut the basil in thin ribbons


I always serve my portabella pizzas with a salad, and tonight was no exception.  Feel free to substitute garlic bread.  


Ingredients:

3-4 portabella mushroom caps
olive oil
salt and pepper
1/4 jar of pizza sauce
1/2-3/4 lb of cubed mozzarella
1/3 bag of turkey pepperoni
5-6 basil leave, julienned (optional)

Directions:

Preheat your grill to 350 degrees.  Clean your mushrooms with a damp paper towel and remove the gills with a spoon.  Drizzle the mushrooms with olive oil and sprinkle with salt and pepper.  Place the mushrooms with the stem side (minus the stem), facing the grill.  Close the grill and allow the mushrooms to cook for 4-5 minutes.  

Open the grill and flip the mushrooms, with the stem side facing up.  Spoon your pizza sauce in as desired.  Add 1/2 of the mozzarella, then the pepperoni, and finally the last of the mozzarella.  Close the grill and allow everything to heat through about 5 minutes.  Remove the portabella pizzas from the grill and garnish with the basil.