Followers

Sunday, July 14, 2013

Summer Pasta Salad

One of my favorite memories is when my mom would grab our beaten up wicker basket, pack some PB&J, and take us out for a picnic.  It is the ultimate summer memory for me.  There is just something special about squeezing onto a too small blanket and eating on the ground in the warm sun.

This recipe is a perfect picnic meal.  It is so flavorful and packed with yummy veggies, so grab your kids, friends, hubby, or all three.  It is picnic time!  This is my Summer Pasta Salad.

Summer Pasta Salad


First, whip up your dressing.  Use the juice and zest from one lemon, 1/4 cup of olive oil, 1 tsp of salt, and 1/2 tsp of pepper.  Wisk it together to combine.


Cook your whole wheat penne pasta in boiling water according to the package directions.  I really love whole wheat pasta, but in this recipe I think it really adds extra depth of flavor.  Make sure to salt your water to season the pasta.


Okay...here comes the not so light part.  You can use less butter, but just think about how much pasta you are using.  This recipe made six servings and six large servings at that.  Use 4 TBSP of butter and melt in a large skillet over medium heat.  Is there any greater smell than melting butter?  


To make up for the butter, measure out four cups of packed spinach leaves.  You could also use arugula or kale, but I love the mild flavor of spinach.


Any variety of tomato would work, but my sweetie loves Roma tomatoes best so that is what I used here.  You could use cherry tomatoes if you want a punch of flavor or colorful cherubs for kids.  Use Heirloom tomatoes if you are a fancy pants person :)


Your butter will be foamy and smelling fantastic by this point.


Add 1/2 cup of chopped walnuts to the butter and warm through.  


Grab a big bowl or large gladware container and start tossing things in.  Drain your pasta and add it to the bowl along with the spinach, tomatoes, walnuts, and 1/2 cup of parmesan cheese.  Toss the pasta salad and allow the spinach to wilt.


But wait!!  Don't forget your dressing!  Pour the dressing over the salad and let the fresh flavors meld together.


Ingredients:
1 package of whole wheat penne
1 lemon; juice and zest
1/4 cup of olive oil
1 tsp salt 
1/2 tsp pepper
4 cups of packed spinach
2 Roma tomatoes, diced
4 TBSP butter
1/2 cup of chopped walnuts
1/2 cup of parmesan

Directions:
Cook pasta according to package directions.  While the pasta is cooking, grab a small bowl and add the olive oil, lemon juice, zest, salt, and pepper.  Wisk the dressing until combined.

In a skillet, melt the butter over medium heat for 10 minutes.  Add the walnuts to the butter and heat the nuts through.  In a large bowl, mix together the pasta, dressing, spinach, tomatoes, parmesan, walnuts, and butter. 

Your summer salad is now complete.  It is fantastic warm and is equally good at room temperature.  This is one reason this makes such a good picnic recipe.  So pack up some apple slices and bottles of water and head to the park.  Those swings, slides, and flower headresses await.  It is picnic time!

Tuesday, July 9, 2013

A Twist on Everyone's Favorite: Pepperoni Pizza

Sorry! Sorry! Sorry!  I know my last post was a pizza recipe, but I had leftover dough and had to do something with it!  Something fabulously delicious, I might add.  I am been completely inspired by all of the gorgeous tomatoes this season and have been whipping up yumminess left and right.  And, seriously, who doesn't like farm grown tomatoes, fresh mozzarella, and basil from your garden?  I am retracting my former apologies and officially saying "You're welcome!"  This is my version of a Pepperoni Pizza.  

Pepperoni Pizza


Ingredients:
1 pizza crust or dough
1 TBSP extra virgin olive oil
2 garlic cloves
1/2 lb of mozzarella cheese, sliced
Pepperoni (as much as you like)
3 tomatoes, sliced and seeded
1/2 cup parmesan cheese
Basil leaves, julienned 

Directions:
Preheat your oven to 400 degrees.  Prepare your pan or pizza stone with a sprinkling of cornmeal to prevent the dough from sticking.  The cornmeal is necessary if you are using dough; if you are using a premade crust then you can omit this step.  Drizzle the dough with olive oil and sprinkle with garlic.  Throw it in the oven for 5-10 minutes until it is partially cooked so the dough is not mushy in the middle.  No droopy, sad pizzas allowed!

While the dough is in the oven, grab your tomatoes and slice them.  Now, this is very important: seed the tomato slices and pat them dry with a paper towel.  Get as much water out of them as you can.  Sprinkle the slices with salt and pepper.  By this time your kitchen will be wonderfully fragrant with the roasting garlic.  

Remove the crust from the oven and begin layering the ingredients.  The order is very important, as well!  Cover your crust with your mozzarella leaving a 1 inch rim of crust on the outside.  Think of the cheese as the glue that holds the whole masterpiece together.  Following the cheese, artfully lay out your pepperoni slices.  I always use turkey pepperoni, but if you are feeling utterly sinful, I won't judge you for using the real stuff.

Lovingly lay out your vibrant tomato slices and top them with the parmesan cheese.  I know this layering seems somewhat backwards, but the tomato will put off a lot of water.  If they are on the bottom layer the crust will get soggy.  Place your pizza back in the oven and bake it for 15 minutes.  I hit mine with the broiler to get that crispy, brown top which I love!  Remove your delicious dinner and sprinkle the top with your basil leaves. 

I hope you enjoy this fresh summer pizza as much as Matt and I did.  It was comforting in the fact that it was bready and cheesy.  Matt loved it because I did not hide veggies like bell peppers and onions in it.  I loved it because it is packed with lycopene and various antioxidants.  I hope you love it too!


Monday, July 1, 2013

Barbecue Chicken Pizza

We have already had the discussion about how much I love bread...and cheese...and bread.  So one of my favorite foods is pizza and I am always looking for new ways of making it.  Pizza is one of those versatile things that you can go in all kinds of directions with.  Since summer has just started, I was feeling some barbecue.

The nice thing about this recipe is you can make it as easy or as complicated as you want.  Btw...who wants to make something complicated?  Me I suppose...I am just a glutton for punishment.  I will tell you how I made it, but also give you a few options to make it more user friendly.  This is my Barbecue Chicken Pizza:

Barbecue Chicken Pizza


Ingredients:
1-1/2 cups warm water
1 tsp instant yeast
4 cups of bread flour/AP flour
1-1/2 tsp kosher salt
1/3 cup extra virgin olive oil
2 Chicken breasts
1 lb of mozzarella, sliced
1/2-1 cup of barbecue sauce
1 Garlic clove, minced
1 TBSP olive oil
Crushed Red Pepper Flakes
Cilantro

Directions:
To make the crust, use a bowl of a stand mixer and add the warm water and instant yeast.  Let it sit for 5-10 minutes.  Add the bread, flour, and salt.  With a paddle attachment, mix the dough for 10 minutes.  Let it rise for 1 hour.  To avoid all of this bread making hassle, you can buy store bought pizza crust.  I really like the Pillsbury wheat crust.

While the dough is rising, cook your chicken breasts.  You can poach, saute, or grill them.  I have tried it all of these ways and they are all good.  One truly delicious option is using some leftover rotisserie chicken.  Shred the chicken and mix it with the barbecue sauce.

Preheat the oven to 375 degrees.  Take your dough and split it in half.  At this point you can freeze the other half and use it for a quick dinner later.  Roll your dough out and brush it with the tablespoon of olive oil and sprinkle with minced garlic and crushed red pepper flakes.  Bake the crust for 10 minutes.  Enjoy the amazing aroma that fills your kitchen.

Remove the crust from the oven and lay the mozzarella on the par cooked crust.  Place the barbecue chicken on the pizza.  You can add sliced red onions, but I am not a big fan of onions so I left them off.  Put your pizza back in the oven and let the cheese melt for about 10 minutes.  Broil the top of the pizza to brown the cheese.  

Take your delicious pizza out of the oven and sprinkle with cilantro.  Btw, Matt doesn't like cilantro which is why his half is so bare.  By this point you will be drooling down your shirt, and I apologize.  I love all of these flavors and especially in the summertime.  So dig in and happy summer everyone!!

Wednesday, June 12, 2013

Homemade Bagels

As many of you know, I love bread, love love LOVE bread.  One of my most favorite breakfasts is a good toasted bagel with cream cheese.  Seriously, my mouth is watering right now.  I know that bagels are not the most healthy breakfast, but it is definitely a splurge that I indulge in every few months.  I have really enjoyed learning how to make bread, rolls, muffins, but bagels...slightly intimidated.  One day, I decided to man up and try it out.  It was an ultimate failure.  The bagels were hard, dry, and slightly shrivelled looking.  I had attempted to make the bagels more healthy by using whole wheat flour.  Obviously this was a bad idea.  I was somewhat defeated, and my bagel craving was not satisfied.

A few months later, I decided to have another crack at it using bread flour.  The result was the absolute opposite: puffy, golden, satisfying breadiness.  Here's how I did it:


Ingredients:

4 cups of bread flour
2 tsp instant yeast
1 tbsp of sugar/honey
1 tbsp of canola oil
1 tsp of salt
1 1/2 cups of warm water

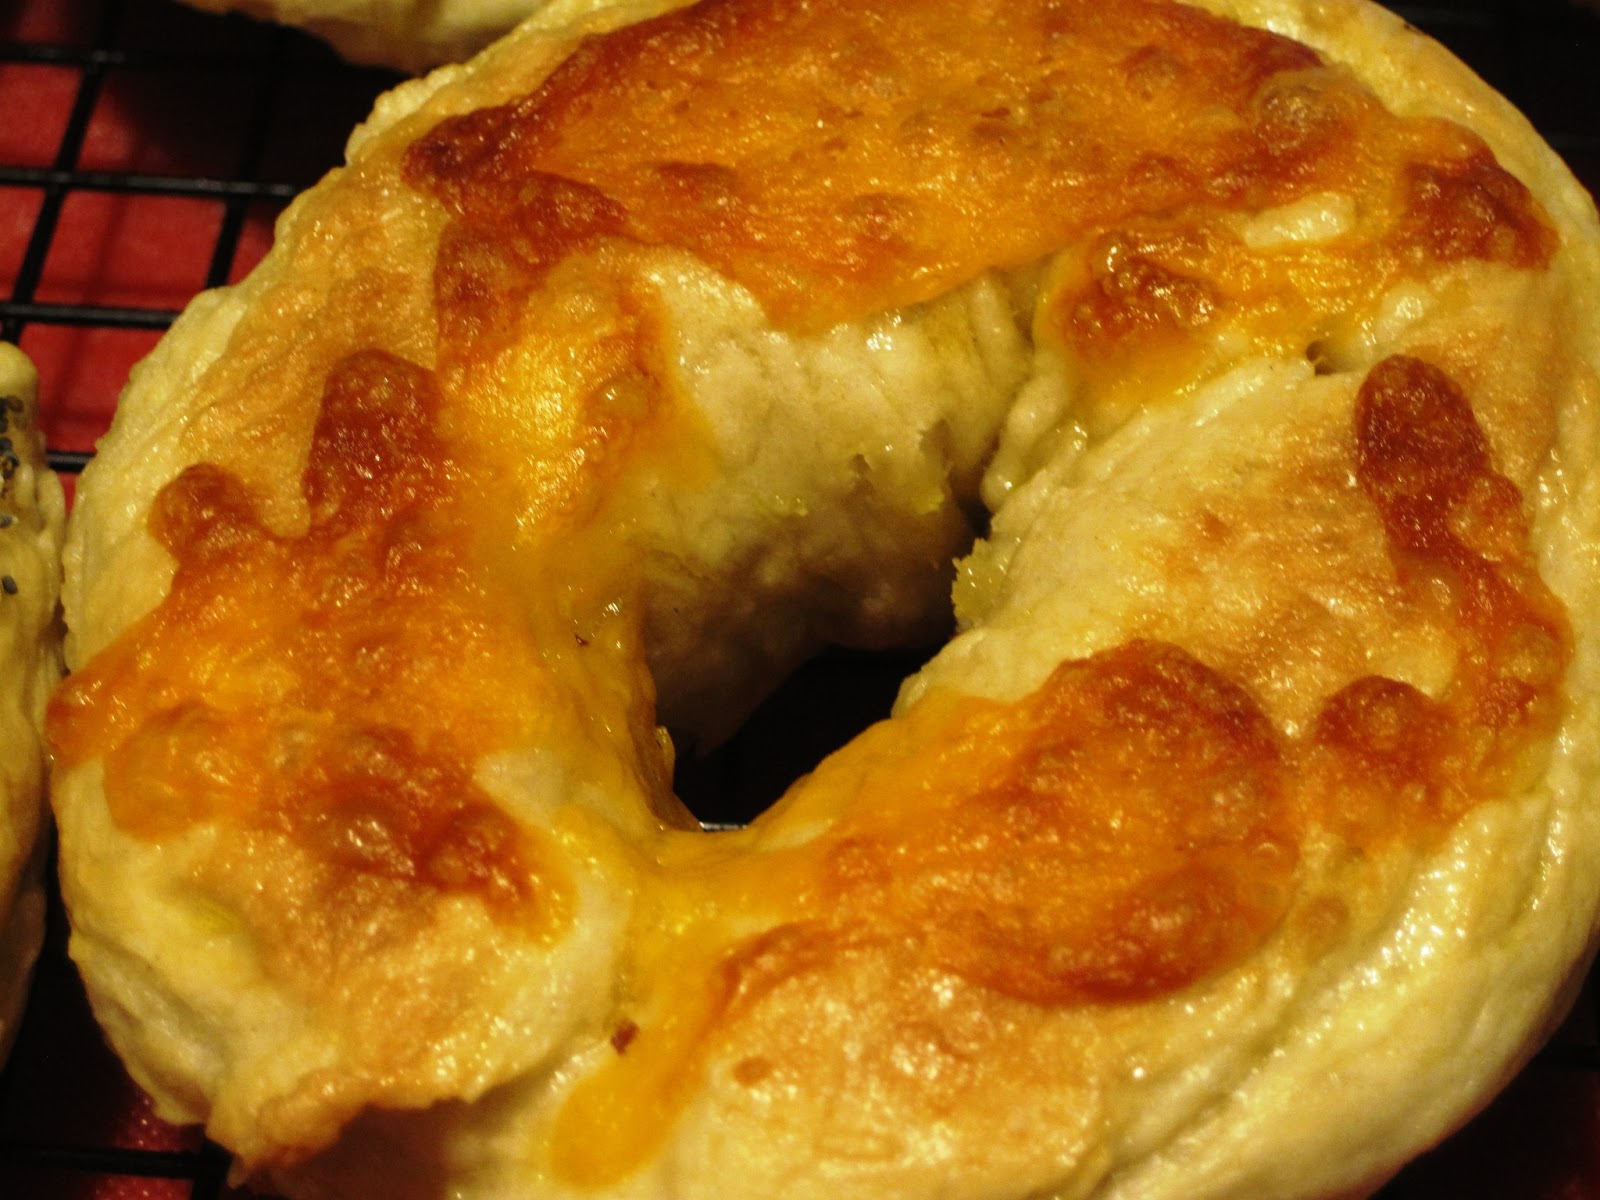
** If you want to make a certain flavors in your bagel dough, add it now.  These bagels were plain with seasonings and cheese added on the top after they were boiled.

Directions:

Mix all of your ingredients together in a bowl.  This is the labor intensive part!  Knead your dough by hand (a stand mixer with a dough hook would work well too) for 10 minutes.  Dump the dough onto a cutting board and cut the dough into 8 pieces.  Roll each piece into a ball.  Let the dough rise for 20 minutes.

Once the dough has risen, take a dough ball and roll it between your fingers to make a snake (this would be a fun activity to do with a child.  It is very tactile).  Once the snake is the length of your two hands laid flat, grab the dough with one hand and wrap it around your fingers.  Smush the ends together to make an "O" shape.  Repeat with the remaining dough balls.  Let the dough rise again for 20-40 minutes.

Preheat the oven to 425 degrees.  Heat a large pot of water to a rolling boil. Add half of the bagels to the boiling water.  The dough will rise to the top and boil each side for one minute.  Remove the first batch of bagels from the water and repeat with the second batch.  This is the point that I added the cheese and seasonings to the top of my bagels pictured above.  Get a cookie sheet, line it with aluminum foil, and spray it with non-stick spray.  Place your bagels on the sheet and bake for 10-12 minutes.  Flip the bagels and continue to bake for another 10-12 minutes until the tops are golden brown.

I know it is difficult, but let the bagels cool for a good 20 minutes.  Cut the bagels, toast them up, and serve with cream cheese, peanut butter, jam, butter... the possibilities are endless!

Matt and I recently went to the Mississippi Delta with his family to visit his grandparents.  I made a batch of cheddar bagels and cinnamon raisin bagels.  They were a hit!  Everyone was very impressed, and little did they know how easy they were to make.  The best part about making bagels for people is that you don't eat the whole bunch.  The worst part about making bagels for people is that you don't get to eat the whole bunch : )


Monday, June 10, 2013

Curry Chicken with Peas

Do you know that feeling when you are just bored with food, bored with the same old things you always make, bored with your regular recipes?  This is the recipe that gets me out of this funk and inspires me to create something new.  Cat Cora introduced me to this Indian dish in her Cat Cora's Classic's with a Twist cookbook.  She calls it Curry Chicken with peas; I call it fantastic!

I made it especially for some of Matt and my friends who recently had a beautiful baby girl.  We love to make dinner for newly "parented" friends and hold their sweet bundle while they eat together.  My mom always told me how much it meant to her when friends would offer to hold one of us so they could just eat... at a table... without a baby in their arms.  It was such a simple thing that meant a lot to her.  To make it even better, it so happens that these friends have travelled all over the world and have adventurous palates.  I knew they were the perfect people to whip this meal up for.   This is my adaptation of Cat Cora's Curry Chicken with Peas.

Curry Chicken with Peas


Ingredients:
3 chicken breasts
3 TBSP olive oil
3 TBSP curry powder
1/2 red bell pepper
Salt and pepper
1 small onion, diced
1 can of lite coconut milk
1/4 cup of water
1 cup of peas

Directions:
Heat a large skillet over medium high-high heat.  Add 1 tbsp of olive oil to the pan.  Cut your chicken breasts into 1 inch cubes.  Stir the chicken together with the curry powder, salt, and pepper.  Cat covers the chicken  at this point and refridgerates for 4 hours.  I hardly ever remember to do this, but feel free to do this if you think about it.  Add half of the chicken to the pan and sear on all sides.  Remove the chicken from the pan and place it on a plate.  Add 1 tbsp of olive oil to your pan and add the other half of the chicken and the bell pepper.  Sear the remaining chicken and remove it from the pan.  

Add the remaining tbsp of olive oil along with the diced onion.  Saute until translucent.  At this point, add the chicken and their juices to the pan along with the coconut milk and water.  Stir the mixture together, cover and simmer for 20 minutes.  Add the cup of peas and stir everything together.  I serve the chicken over rice and pita.  Enjoy!


              Justin with sweet Corrine
                                                                                            Emily and Emilee     


The votes are in!  Happy plates all around!  Justin and Emily, we feel so blessed to have y'all in our lives, and loved meeting your beautiful daughter.  I can't wait for us to get together again.

Saturday, May 25, 2013

My Big Brother

Ever since I can remember, my big brother has always been there.  Being a second child in a family of four, I never knew what it was to be alone.  There was always someone to watch and learn what was coming next whether it be with teachers in school, standardized testing, or general life events.  Throughout all of my years, I became known as Jonathan Peeples little sister, and this was a name I felt like I had to live up to.  


For example, when we were kids, Jonathan loved the movie, The Hobbit, so naturally, I loved The Hobbit.  In lower elementary school, Jonathan had an amazing memory and for school, learned by heart the longest poems in our book, like the Jabberwocky and You Are Old Father William.  I was not as skilled in this area, but I tried my darndest.  In upper elementary, Jonathan loved playing baseball, so I signed up for softball.  In high school, Jonathan loved going to see bands, so I wanted to go to the shows too.  I tried to live up to my nickname by being as smart, witty, and well-rounded as my brother.

Recently, our family is moving into a new phase of our lives.  Jonathan graduated from medical school, and if this wasn't enough of a change, he is moving to New Hampshire to complete his residency at Dartmouth.  Now, we kids have moved out of the house to go to college, but we always knew we would be back.  None of us have ever lived more than a few hours away.  None of us has ever missed a major holiday with the family.  None of us has ever graduated from a professional school before.  I feel like when Rachel has to move out when Chandler and Monica decide to move in together.  (If you have no idea what I am talking about, shame on you!)  


It's like the end of an era!!


Although these last few weeks before Jonathan moves are bittersweet, I can't help but express the fact, that I am so proud of my big brother and all that he has accomplished.  I know that he has many more great things to come.  All that I have left to say is that I love you and will miss you terribly!

Monday, May 20, 2013

Pistachio Chicken

With swimsuit season looming before us, several of my friends have decided to prepare by living the low-carb lifestyle.  It got me thinking about some really healthy, energy-rich foods and this recipe popped into my head.  I got it from my Mom, and trust me, it is so full of flavor you won't even notice the bread is missing from the table.  

Pistachios have so many health benefits, from lowering your LDLs (bad cholesterol) to making your skin glow.  They are loaded with vitamin B6 which aids in blood health, nervous, and immune systems.  They also are chock full of carotenoids that are known to decrease risk of macular degeneration.  There is really no reason to not eat pistachios, so drumroll, please.  This is my mom's Pistachio Chicken.

Pistachio Chicken


As the name states, the ingredients are pistachios... and chicken.  I served mine with some roasted potatoes and a spinach salad, but if you are low-carbing it, this would make a delicious chicken salad.


This recipe makes 2 servings, but you can easily double or triple the recipe if you need to.  Take 1/2 cup of shelled pistachios and place them in a food processor.  I buy the pistachios from Sams already shelled, making this recipe so quick.


Pulse the nuts until they are coarse.  Meanwhile, preheat your oven to 350 degrees.


Take one chicken breast, cut it in half so that you have 2 chicken cutlets.  Pound out the cutlets until they are about 1/2 inch thick.  Press the cutlets into the pistachio crumbs.


Heat a pan with a splash of olive oil to medium-high heat.  Cook the chicken breast for a few minutes on one side, and flip it to cook the other side for a minute or two.  Remove the cutlets from the pan and place them in a small casserole dish.  Finish cooking the chicken in the oven for another 10 minutes.


Pistachio chicken is so unbelievably flavorful and juicy.  The nuts get toasty and crunchy.  There is only one more thing to say: Get Crackin'!