Followers

Monday, August 19, 2013

Babba's Mac and Cheese

I was blown away by all of the wonderful comments and words of encouragement that I received after my last post.  Thank you all so much for the kind words, thoughts, and prayers.  Because I had such a huge response last time, I didn't know what to blog about next.  There is no way I can top the emotional rollercoaster of my last post, so I chose something that has been more consistent in my life.  

I was so blessed in college to have a really tight-knit group of girlfriends.  We became friends the first weekend of school during Katrina, and we have stayed friends since then.  The girl who brought me into this friend group is my dear, beautiful friend, Sarah Beth.  We have been through so much over our years together.  We have brushed our teeth together, we have camped together, we have rolled down hills together, we have laughed and cried together.  I thought it was only appropriate to post a few pics from our journey.


This is SB and me at her gorgeous wedding...well, waiting in the dressing room.  It was a fantastic night and probably the most beautiful reception I have ever been to.  A few months after SB's wedding, the girls got together for dinner, and as girls, we talked about girly stuff like significant others, work, and the conversation led to recipes.  Sarah Beth said she made her Babba's (grandmother) mac and cheese all the time.  She told me that it is a really easy, good recipe.  She gave me the recipe, and I waited...and I waited... and I waited.  I was too scared to make a recipe that someone's Babba had made!  No one can make food better than Babba.  Finally, a few weeks ago, I made it, and it is probably the most delicious thing I have ever created.  I am not exaggerating.  Matt took a few bites and finally slammed down his fork and said, "Everything else on this plate is crap and I don't want to eat it so I can eat more mac and cheese."  This is Babba's Mac and Cheese.

 Babba's Mac and Cheese


Don't be afraid!  You can do it.  Not just Babba's can make something delicious!


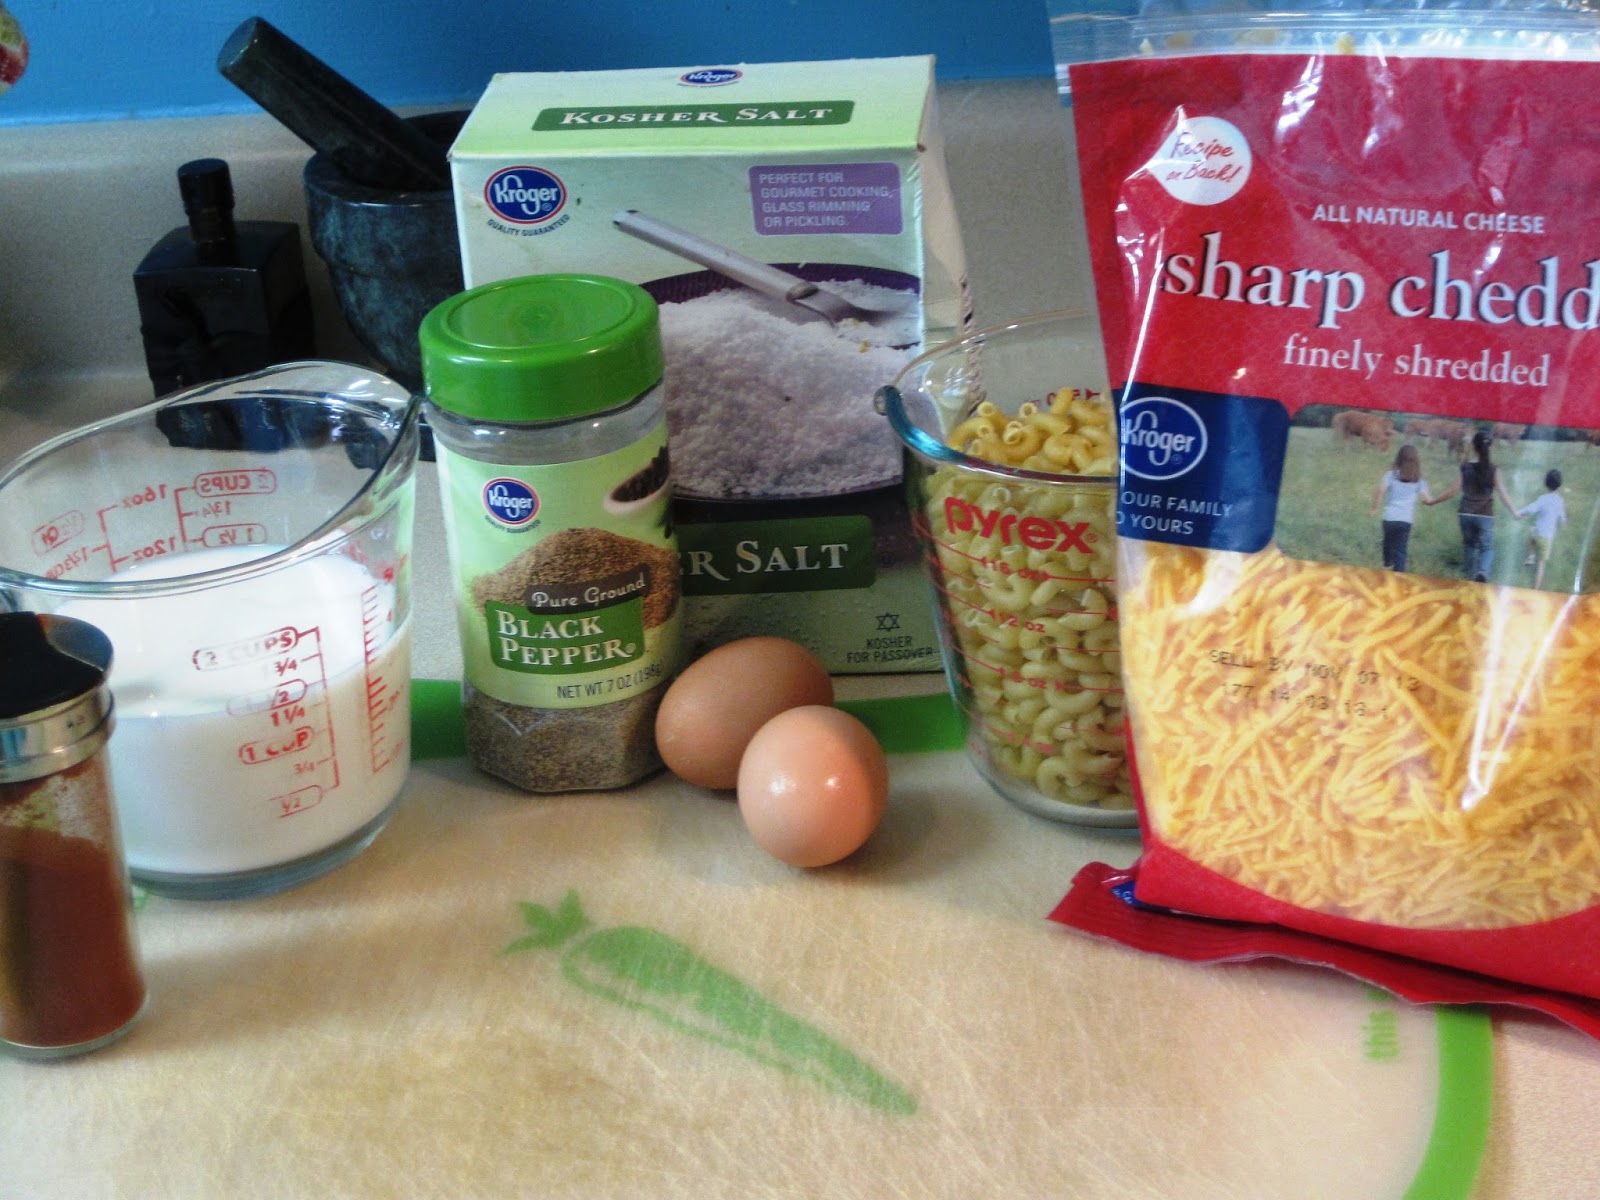
The star players are macaroni, cheddar, 2 eggs, milk, salt, pepper, and paprika.  That's it!  Does it get any easier?  You probably have all of these things in your kitchen waiting on you.


Firstly, you must cook your pasta according to the package directions.  Use 8oz of macaroni, which I found to be about 2 cups.


While your pasta is cooking, lightly beat your eggs.  Add 1 1/2 cups of milk to the lightly beaten eggs. 


Stir in 1 teaspoon of salt and 1/8 teaspoon of pepper to your milk/egg mixture.


Drain your pasta and grab a 9x9 casserole dish.  Spray the dish with non-stick cooking spray.


Layer 1/3 of your noodles on the bottom of the dish


Sprinkle 1/3 of the cheddar cheese on top of the pasta


Add another 1/3 of the noodles, followed by 1/3 of the cheese


Add the last 1/3 of the noodles and RESERVE the rest of the cheese for later.


Pour your egg/milk mixture over your macaroni


Cover your delicious mixture and put it in a 350 degree oven for 30-45 minutes.  


Remove your casserole dish from the oven and uncover it.  Now it starts getting difficult...the smell starts overwhelming the other senses, and you will become basically useless.


Cover the mac and cheese with the last 1/3 of the cheese and sprinkle the top with paprika.  Let the mac and cheese stand for 10 minutes to melt the cheese.  Honestly, I did not make it quite 10 minutes.  I found a shovel and started pouring cheese and pasta and  I think a little bit of cocaine into my mouth.  I could not stop.  Okay, that may have only happened in my fat kid brain, but sometimes I really miss that kid.  


I am honestly surprised that I got a picture of this without a fork it in it, because it really was devoured shortly after.  Matt actually said, "This is hands down the best macaroni and cheese I have ever had."  So with all of this said, I do not have to say, I hope you enjoy, because I know you will.  This is not a suggestion.  Make this recipe and enjoy!

Ingredients
8oz of macaroni
2 1/2 cups of shredded cheddar
1 1/2 cups of milk
2 eggs lightly beaten
1 tsp salt
1/8 tsp pepper
paprika

Directions
Preheat oven to 350 degrees.  Cook pasta.  Layer 1/3 of the noodles in a lightly greased casserole dish.  Sprinkle with 1/3 of the cheese.  Repeat layers.  End with the noodles.  Pour over the milk mixture.  Bake covered at 350 degrees for 30 to 45 minutes.  Uncover and top with cheese and paprika.  Let stand for 10 minutes.


Thursday, August 1, 2013

I Was Blind, but Now I See

Usually these blog posts are easy for me to whip up.  Make something yummy.  Take a few pictures.  Tell everyone how I did it.  Done!  This is not going to be so easy.  I have shied away from talking about myself on these blogs due to the fact that I simply don't think my life is interesting enough for people to want to read about it.  But, last week an event flipped my world upside down and with so many of you praying for me, I felt it was necessary to share how God shook my world.  It is not a story about me; it is a story about what God did in my life, and I can be okay telling a story about that.

Let me set the stage.  A few weeks ago, I was at max stress level.  I am currently working on applying for a residency, studying for our National Dental Boards, writing a research abstract, and in school from 8-5.  The stress was apparent in my work.  I went a whole week with absolutely nothing going right on a single patient.  By Thursday afternoon, I did not think anything about the intense muscle pain I was experiencing over my eyes.  It hurt to move my eyes quickly, but I knew it was simply the strain that my eyes had been experiencing throughout the week.  When I woke up Friday morning, I began noticing a hazy spot obstructing part of my vision in my right eye.  It progressively got worse, so I do what I always do in situations like this.  I call my dad.  I was trying to not make a big deal of it, but the fact that he sounded more worried than I did made me nervous.  Usually when I call to tell him an ailment, he automatically tells me what it is and when it will go away.  This was new for me.

He started making calls to see if any of his ophthalmology friends could see me Friday night.  Dad was able to get in touch with his friend, Dr. Bill Ashford.  I hated being that patient that calls on a Friday afternoon to ruin the doctor's weekend, but Dr. Ashford was so kind and caring.  He examined my eyes and said he thought it was just muscle weakness and should get better over the weekend.  By Sunday, I could barely make out shapes in my right eye.  I saw Dr. Ashford on Sunday morning where he diagnosed me with Optic Neuritis.  Immediately when he said this my tongue caught in my throat and my heart dropped to my stomach.  Optic Neuritis triggered Multiple Sclerosis to pop in my head.  I asked Matt to look on his phone to see if I was right...I was.

With having so many doctors in my family, they already knew before I did that I might have multiple sclerosis.  I was the one that was slow to catch on.  This was why dad was so worried.  This is why mom kept calling hoping my vision had gotten better.  God, no!!!!  Multiple sclerosis is where plaques develop in the brain and spinal cord and prevent communication between the brain and the extremities.  With me becoming a dentist in the next year, this was devastating news.  I had my whole life planned out.  I was going to do a residency in Pediatrics next year.  Have a baby two years after that.  Move back to Jackson and start a practice.  Have another baby.  Work for 20-30 years, retire, and spend a wonderful, leisurely life with my wonderful husband.  My plans began to crumble and fall through my fingers like sand.

I was admitted to the emergency room on Sunday and the testing began.  I was told that I needed to be put on IV steroids and was going to have to stay in the hospital for the week.  I have never been so scared in my whole life.  If any of you know me, I like to be busy.  The worst part of the situation was I was lying around for 23 hours out of the day with nothing to think about except what my future held.

I looked to Matt's sweet face next to me.  I could not ask this loving man to give up so much of his life to taking care of me in the future.  I know he would do it unbegrudgingly, but he deserves better than that.

I looked to my Mom's hand who was holding mine.  She is my biggest cheerleader who had always been there to encourage me when I was called mean names or was told I was not smart enough to make it to dental school.

I looked to my Dad's sad eyes wishing he could stop this.  He was my protector who did everything he could to shield me from the pain of this world.

I looked to my brothers who were doing everything they could to lighten the mood and give me a bright outlook in this scary time.

For comfort, I pulled out my old leather Bible and searched its pages.  I came upon Mark 2, the story of Jesus healing the paralytic.  Jesus is preaching to a crowd and four men are attempting to get their paralyzed friend to Jesus for him to be healed.  They can't get through the crowd as much as they try.  They do not give up.  They take their friend up to the roof, break through the roof, and lower their friend at Jesus' feet.

I have always been the friend who will pray, who will fight, who will do anything to help a friend in need.  I have never been the paralytic.  I felt so helpless and out of control.  I have never had so many people praying for me and laying me at my Savior's feet.  I realized I never truly had control of my life...ever. Through our plans and goals, we create an illusion of having control of our lives and destiny, but God can change our lives in a heartbeat.

As the realization that I do not have control washed through my brain, the feeling of ultimate freedom replaced the fear I had been experiencing.  I became certain of several things: 1. God is in control. 2. I do not have to know all the answers. 3. Everything works for the will of my Father.

After this week of testing and waiting and learning and more waiting, I went back to my doctor to get all of my test results.  As I sat and waited for the doctor to tell me the news, I had a calm come over me.  God said "Trust me, child."  I could see my mom out of the corner of my eye, about ready to spring from her chair in anticipation.  When the doctor said, "All of your tests came back normal, so we think this is just an isolated event," I could barely believe my ears.  After many many prayers of thanksgiving, I am feeling back to normal and my vision is at 100% what it was before this episode.

I am so thankful for those of you who prayed for me and encouraged me through this.  I am proof that prayer does work and it gave me the strength to get through this ordeal.  Since we got the news, I can't keep the song It Is Well With My Soul out of my head.

"When peace like a river attendeth my way; 
When sorrows like sea billows roll; 
Whatever my lot thou hast taught me to say; 
It is well, It is well with my soul."

Monday, July 29, 2013

Summer Lasagna Roll Ups

When I was a little girl, my absolute favorite food was creamy pasta.  Everytime we went out to eat, I got some kind of pasta in cream sauce.  At Bravo, it was Fettuccini Alfredo.  At Amerigos, it was Three Cheese Tortellini with Lump Crabmeat.  At Olive Garden, it was Seafood Alfredo.  It hits all the comfort notes in my mind and made me feel safe, happy, and truly content.  That is until I had my realization that creamy pasta means it is made with heavy cream, butter, and flour which had hardly any nutritional value for me.  Once my journey for healthy living commenced, I began to strive to make food that hits those same comforting notes but also gives my body something to work with.  This is one such recipe!  These little cuties are my Summer Lasagna Roll Ups!

Summer Lasagna Roll Ups


Can't you just taste the melty cheese, sense the chewy of the pasta, and smell the floral basil?   This is also a great recipe for little ones that love to help in the kitchen.  You can slip in some veggies, and they can have fun making the yummy bundles.


The stars of this recipe are: 12 lasagna sheets, parmesan, tomato sauce, part-skim or low fat ricotta cheese, garlic, 1/4 cup of basil leaves plus a few for garnish, and whole milk mozzarella.


Preheat your oven to 375 degrees and coat the bottom of a casserole dish with tomato sauce.  I used about 1 cup of tomato basil tomato sauce that I had leftover in my fridge.


Bring a large pot of salted water to a boil and add your noodles.  I usually use whole wheat pasta, but I searched the Kroger high and low with no avail.  Regular pasta will just have to do this time :)


Slice 3 tomatoes and sprinkle them with salt and pepper.  I typically seed the tomatoes when I am making a pasta dish, but since this is not a very saucy pasta, I left them just as they are.

I know I rave about tomatoes all the time, but they are so so good for you!  They are packed full of vitamins A, C and beta-carotene to fight all of those free radicals from the summer sun.  They are loaded with lycopene which fights cancer.  They have a high water content which makes you feel fuller faster.  There really is no reason not to rave about tomatoes. 


Pluck your basil leaves from their stems, lay them on top of each other, and roll them as if you were making a cigar.  Cut your leaves into ribbons.


Now, lets make the filling for your roll ups.  In a bowl, mix the 1/3 cup of parmesan, 1 container of ricotta cheese, 2 garlic cloves minced, 3/4 of your basil leaves, and a pinch of salt and pepper.  I used part skim ricotta cheese because whole milk ricotta is high in fat, but ricotta in general is packed with protein similar to Greek yogurt.  I also used Parmesan cheese because it is low in fat and high in flavor.


In these semi healthy/semi-indulgent recipes, I like to use all lower fat items with the exception of one.  In this recipe, I used real mozzarella.  It hits that velvety comfort sensation without using heavy cream.  I used about 1/2 lb of fresh mozzarella to top off our bundles.


Get those kiddies ready.  It is assembly line time!  I have a colander for our pasta, an assembly station, and a rolling station.


Strain your pasta and run cool water over it until it is cool enough to handle.


Step 1: Take your noodle and slather some ricotta along its length.  I spy gorgeous flecks of basil!


Step 2: Lay 2 slices of tomatoes over the ricotta.  Start with one end and roll over the tomato slices until you get to the other end.


Step 3: Place in the casserole dish


Step 4: Lay a slice of mozzarella over the bundle and repeat with the rest of your roll ups.


Drizzle the tops with some heart healthy olive oil and place the dish in the oven.  Bake the bundles for 12-15 minutes.  


Garnish your roll ups with the remaining basil and dish up some comfort food.  

Ingredients:
12 Lasagna sheets
1 cup of tomato sauce
2 garlic cloves, finely minced
1/4 cup of basil leaves plus more for garnish, cut into ribbons
1 container of low fat Ricotta
1/3 cup of parmesan cheese
3 tomatoes, sliced
1/2 lb mozzarella, sliced
Olive oil
Salt and pepper

Directions:

Preheat your oven to 375 degrees and bring a large pot of water to a boil.  Use a medium sized casserole dish and slather the bottom of the pan with 1 cup of tomato sauce.  Add the lasagna noodles to the boiling water.

In a medium bowl, mix the garlic, ribbons of basil, parmesan, ricotta, salt, and pepper until combined.  Drain your pasta and run the noodles under cool water to allow for handling.  On a cutting board, lay out one noodle and slather it with the ricotta mixture.  Lay 1-2 slices of tomatoes on top and roll the noodle into bundle.  Place each bundle into the casserole dish and lay a piece of mozzarella on top of each bundle.  Drizzle the top with olive oil.

Place the casserole dish into the oven and bake for 12-15 minutes until the top gets brown and bubbly.  Garnish the top with basil and let the comfort begin!


Sunday, July 14, 2013

Summer Pasta Salad

One of my favorite memories is when my mom would grab our beaten up wicker basket, pack some PB&J, and take us out for a picnic.  It is the ultimate summer memory for me.  There is just something special about squeezing onto a too small blanket and eating on the ground in the warm sun.

This recipe is a perfect picnic meal.  It is so flavorful and packed with yummy veggies, so grab your kids, friends, hubby, or all three.  It is picnic time!  This is my Summer Pasta Salad.

Summer Pasta Salad


First, whip up your dressing.  Use the juice and zest from one lemon, 1/4 cup of olive oil, 1 tsp of salt, and 1/2 tsp of pepper.  Wisk it together to combine.


Cook your whole wheat penne pasta in boiling water according to the package directions.  I really love whole wheat pasta, but in this recipe I think it really adds extra depth of flavor.  Make sure to salt your water to season the pasta.


Okay...here comes the not so light part.  You can use less butter, but just think about how much pasta you are using.  This recipe made six servings and six large servings at that.  Use 4 TBSP of butter and melt in a large skillet over medium heat.  Is there any greater smell than melting butter?  


To make up for the butter, measure out four cups of packed spinach leaves.  You could also use arugula or kale, but I love the mild flavor of spinach.


Any variety of tomato would work, but my sweetie loves Roma tomatoes best so that is what I used here.  You could use cherry tomatoes if you want a punch of flavor or colorful cherubs for kids.  Use Heirloom tomatoes if you are a fancy pants person :)


Your butter will be foamy and smelling fantastic by this point.


Add 1/2 cup of chopped walnuts to the butter and warm through.  


Grab a big bowl or large gladware container and start tossing things in.  Drain your pasta and add it to the bowl along with the spinach, tomatoes, walnuts, and 1/2 cup of parmesan cheese.  Toss the pasta salad and allow the spinach to wilt.


But wait!!  Don't forget your dressing!  Pour the dressing over the salad and let the fresh flavors meld together.


Ingredients:
1 package of whole wheat penne
1 lemon; juice and zest
1/4 cup of olive oil
1 tsp salt 
1/2 tsp pepper
4 cups of packed spinach
2 Roma tomatoes, diced
4 TBSP butter
1/2 cup of chopped walnuts
1/2 cup of parmesan

Directions:
Cook pasta according to package directions.  While the pasta is cooking, grab a small bowl and add the olive oil, lemon juice, zest, salt, and pepper.  Wisk the dressing until combined.

In a skillet, melt the butter over medium heat for 10 minutes.  Add the walnuts to the butter and heat the nuts through.  In a large bowl, mix together the pasta, dressing, spinach, tomatoes, parmesan, walnuts, and butter. 

Your summer salad is now complete.  It is fantastic warm and is equally good at room temperature.  This is one reason this makes such a good picnic recipe.  So pack up some apple slices and bottles of water and head to the park.  Those swings, slides, and flower headresses await.  It is picnic time!

Tuesday, July 9, 2013

A Twist on Everyone's Favorite: Pepperoni Pizza

Sorry! Sorry! Sorry!  I know my last post was a pizza recipe, but I had leftover dough and had to do something with it!  Something fabulously delicious, I might add.  I am been completely inspired by all of the gorgeous tomatoes this season and have been whipping up yumminess left and right.  And, seriously, who doesn't like farm grown tomatoes, fresh mozzarella, and basil from your garden?  I am retracting my former apologies and officially saying "You're welcome!"  This is my version of a Pepperoni Pizza.  

Pepperoni Pizza


Ingredients:
1 pizza crust or dough
1 TBSP extra virgin olive oil
2 garlic cloves
1/2 lb of mozzarella cheese, sliced
Pepperoni (as much as you like)
3 tomatoes, sliced and seeded
1/2 cup parmesan cheese
Basil leaves, julienned 

Directions:
Preheat your oven to 400 degrees.  Prepare your pan or pizza stone with a sprinkling of cornmeal to prevent the dough from sticking.  The cornmeal is necessary if you are using dough; if you are using a premade crust then you can omit this step.  Drizzle the dough with olive oil and sprinkle with garlic.  Throw it in the oven for 5-10 minutes until it is partially cooked so the dough is not mushy in the middle.  No droopy, sad pizzas allowed!

While the dough is in the oven, grab your tomatoes and slice them.  Now, this is very important: seed the tomato slices and pat them dry with a paper towel.  Get as much water out of them as you can.  Sprinkle the slices with salt and pepper.  By this time your kitchen will be wonderfully fragrant with the roasting garlic.  

Remove the crust from the oven and begin layering the ingredients.  The order is very important, as well!  Cover your crust with your mozzarella leaving a 1 inch rim of crust on the outside.  Think of the cheese as the glue that holds the whole masterpiece together.  Following the cheese, artfully lay out your pepperoni slices.  I always use turkey pepperoni, but if you are feeling utterly sinful, I won't judge you for using the real stuff.

Lovingly lay out your vibrant tomato slices and top them with the parmesan cheese.  I know this layering seems somewhat backwards, but the tomato will put off a lot of water.  If they are on the bottom layer the crust will get soggy.  Place your pizza back in the oven and bake it for 15 minutes.  I hit mine with the broiler to get that crispy, brown top which I love!  Remove your delicious dinner and sprinkle the top with your basil leaves. 

I hope you enjoy this fresh summer pizza as much as Matt and I did.  It was comforting in the fact that it was bready and cheesy.  Matt loved it because I did not hide veggies like bell peppers and onions in it.  I loved it because it is packed with lycopene and various antioxidants.  I hope you love it too!


Monday, July 1, 2013

Barbecue Chicken Pizza

We have already had the discussion about how much I love bread...and cheese...and bread.  So one of my favorite foods is pizza and I am always looking for new ways of making it.  Pizza is one of those versatile things that you can go in all kinds of directions with.  Since summer has just started, I was feeling some barbecue.

The nice thing about this recipe is you can make it as easy or as complicated as you want.  Btw...who wants to make something complicated?  Me I suppose...I am just a glutton for punishment.  I will tell you how I made it, but also give you a few options to make it more user friendly.  This is my Barbecue Chicken Pizza:

Barbecue Chicken Pizza


Ingredients:
1-1/2 cups warm water
1 tsp instant yeast
4 cups of bread flour/AP flour
1-1/2 tsp kosher salt
1/3 cup extra virgin olive oil
2 Chicken breasts
1 lb of mozzarella, sliced
1/2-1 cup of barbecue sauce
1 Garlic clove, minced
1 TBSP olive oil
Crushed Red Pepper Flakes
Cilantro

Directions:
To make the crust, use a bowl of a stand mixer and add the warm water and instant yeast.  Let it sit for 5-10 minutes.  Add the bread, flour, and salt.  With a paddle attachment, mix the dough for 10 minutes.  Let it rise for 1 hour.  To avoid all of this bread making hassle, you can buy store bought pizza crust.  I really like the Pillsbury wheat crust.

While the dough is rising, cook your chicken breasts.  You can poach, saute, or grill them.  I have tried it all of these ways and they are all good.  One truly delicious option is using some leftover rotisserie chicken.  Shred the chicken and mix it with the barbecue sauce.

Preheat the oven to 375 degrees.  Take your dough and split it in half.  At this point you can freeze the other half and use it for a quick dinner later.  Roll your dough out and brush it with the tablespoon of olive oil and sprinkle with minced garlic and crushed red pepper flakes.  Bake the crust for 10 minutes.  Enjoy the amazing aroma that fills your kitchen.

Remove the crust from the oven and lay the mozzarella on the par cooked crust.  Place the barbecue chicken on the pizza.  You can add sliced red onions, but I am not a big fan of onions so I left them off.  Put your pizza back in the oven and let the cheese melt for about 10 minutes.  Broil the top of the pizza to brown the cheese.  

Take your delicious pizza out of the oven and sprinkle with cilantro.  Btw, Matt doesn't like cilantro which is why his half is so bare.  By this point you will be drooling down your shirt, and I apologize.  I love all of these flavors and especially in the summertime.  So dig in and happy summer everyone!!