Followers

Sunday, November 3, 2013

Momma's Pork Chops

What comes to mind when you think about home cooked meals?  Do you think green bean casserole? Red beans and rice?  Sunday roast?  I think about my mom's pork chops.  Since I come from a large family, finding a dinner that we all liked was difficult.  We had several favorites: roast beef with rice, turkey and gravy (which for some reason we called "Munchkin Meat"), and these pork chops.  My Mom always worked so hard to make meals that we liked and wanted dinner time to be family time.  I didn't realize until I was older how rare sit down dinners were to other families.  I will always appreciate my Mom taking the time to make dinner every night, so thank you, Mommie!  It brought us all together and created so many memories.  These pork chops are super easy and made with non-intimidating ingredients.  It is a perfect meal  for someone who is new to cooking and wants to blow their spouse away!  These are my Momma's Pork Chops:

Momma's Pork Chops


Delicious smells fill my kitchen.  I begin to reminisce over old memories of family dinners, saying Grace, stumping Dad with things we learned at school, chewing with our mouth open, drinking our milk, and thanking Mom for making dinner.  


Eww... mom, not Brussels sprouts!!  Actually, my mom never made us eat Brussels sprouts, but I wanted to give it a try.  Matt has always disliked anything "cabbage-y."  That sounds like a challenge to me!
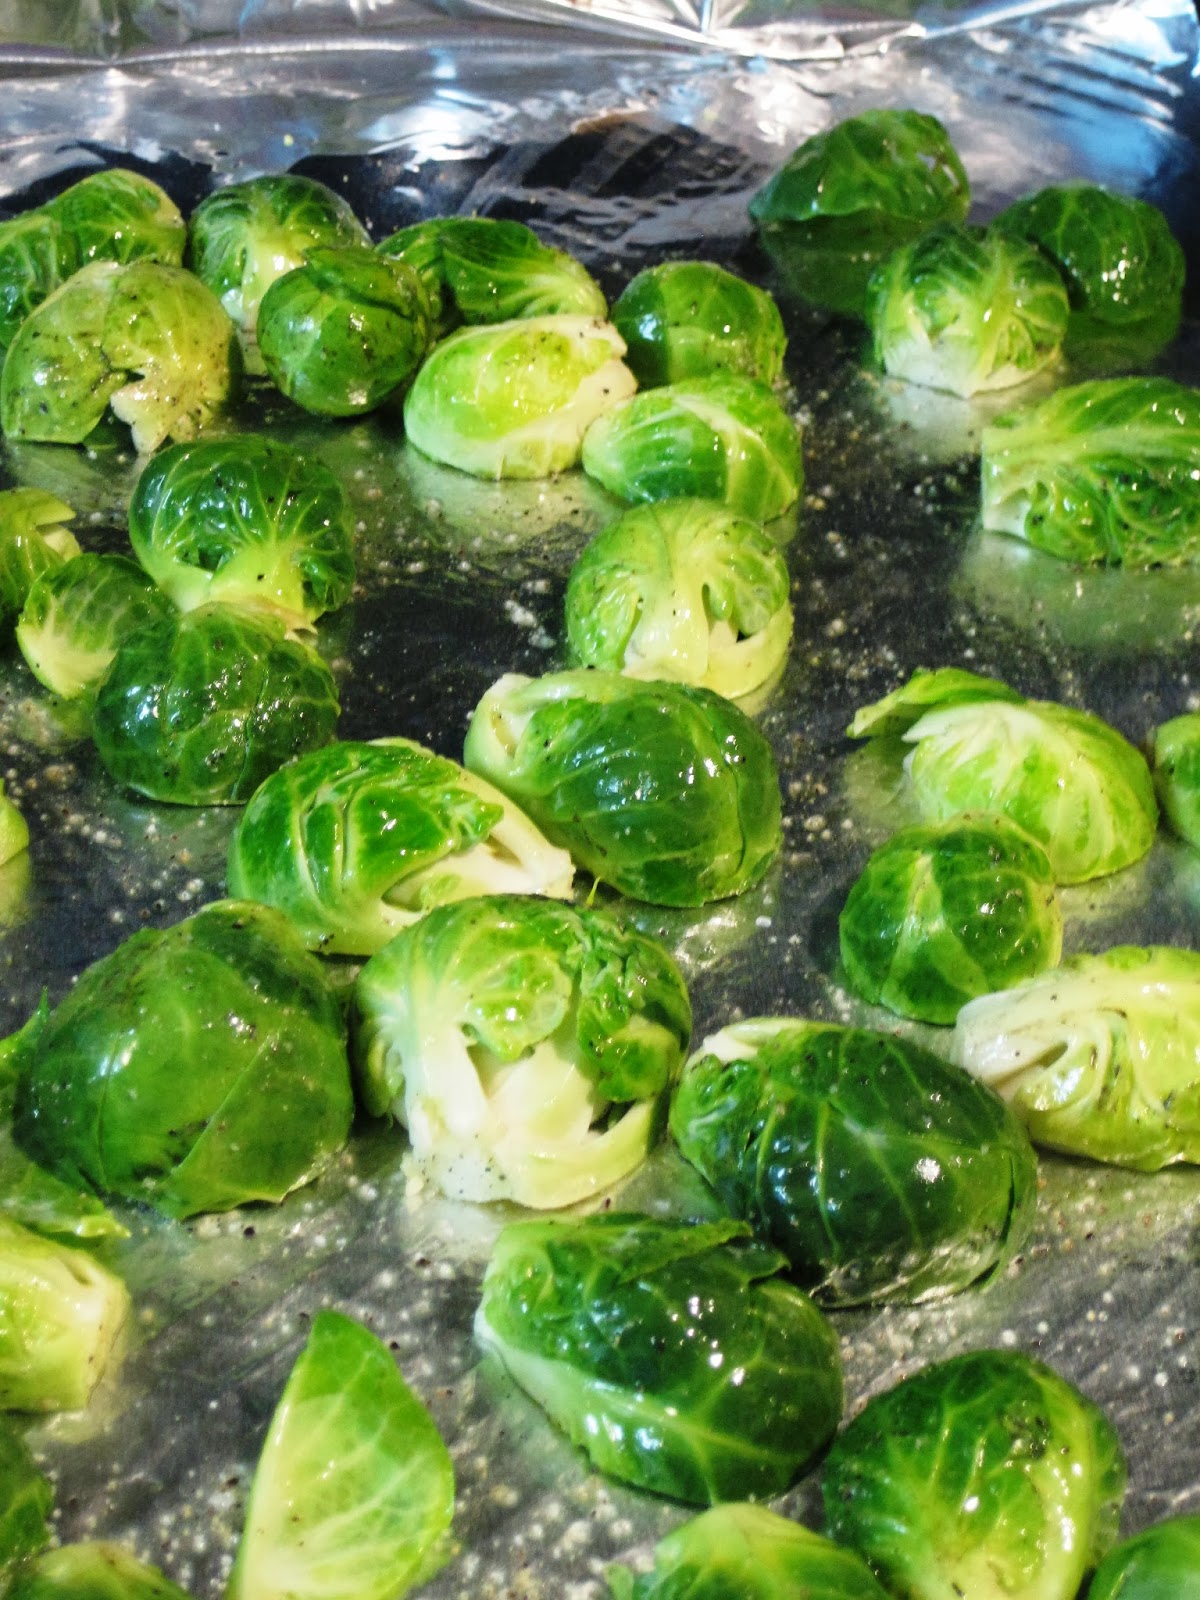
I removed the outer leaves that had yellowed slightly.  The large sprouts, I cut in half and the small ones, I left whole.


I preheated the oven to 400 degrees then tossed the sprouts with salt, pepper, and olive oil. 


I placed the sprouts cut side down initially to brown the bottoms.


After about twenty minutes, I flipped the Brussel sprouts.  Look at the beautiful brown color that has developed!


I let the sprouts roast for another 10-15 minutes.  This allowed the sprouts to develop a fantastically rich taste for such a disliked veggie.  You really should give it a try.  If you don't like Brussel sprouts this way then you just plain don't like them.  Btw... if you are wondering, Matt did like them!


While the Brussels sprouts are roasting, measure out 1 cup of rice.  I chose brown rice, so I used a little over 2 cups of water to cook it in.


Now that everything else is cooking, it is time to get to Momma's pork chops!  Take about 1/2 a cup of flour, 1/2 tsp salt, 1/2 tsp of garlic powder, and 1/4 tsp of black pepper.  


Mix everything together on a plate.  This will be enough to coat four pork chops.


I used bone-in pork chops because that is what Momma used.  The bone adds flavor to the meat and keeps it juicy.  Pork has a tendency to dry out if it cooks too long.  I have found that the bone-in kind stay juicier, but for my dear friends that don't eat meat off the bone, feel free to use boneless pork chops.


Place each pork chop in the flour mixture


And coat it lightly on each side of the chop.


Heat 1 TBSP of olive oil in a large skillet to medium high heat.  


Cook the pork chops on each side for about four minutes until they are cooked through.  


Remove the chops from the pan and let them rest on a plate.  See all those yummies at the bottom of the pan?  That, my friends, is called flavor!


Yay!  Rice is done!  Dinner is almost ready.


Take your rice and add it to the pan you cooked the pork chops in.  Stir the rice and scrape up all of those brown bits off the bottom of the pan.


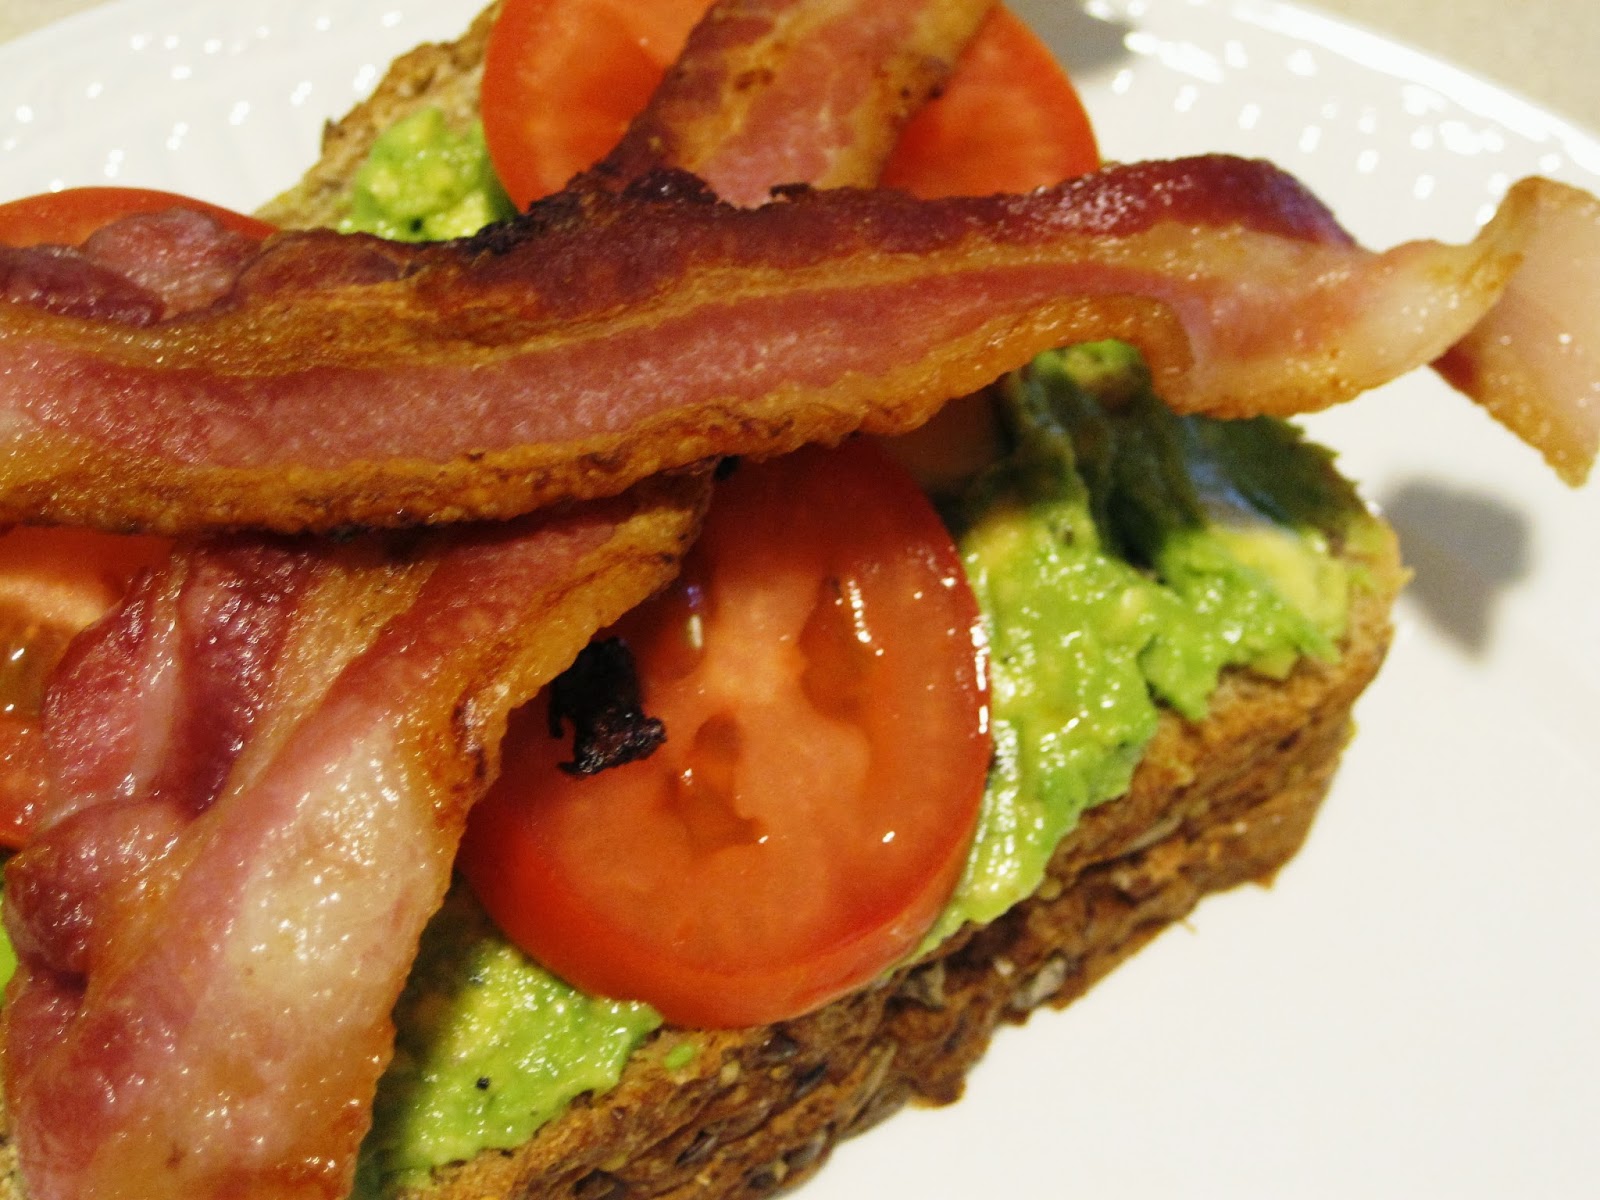
Serve up your delicious Mom and kid approved meal.  This meal brings back so many memories to me, and I hope it inspires you to create a few of your own.

Ingredients
Brussels sprouts:
1/2 lb of brussels sprouts
1 tsp of salt
1/2 tsp of pepper
1 TBSP olive oil

Rice:
1 cup brown rice
2 1/4 cup of water
1/2 TBSP of butter

Pork Chops:
4 bone-in pork chops, trimmed of fat
1/2 cup of flour
1/2 tsp of salt
1/2 tsp of garlic powder
1/4 tsp of pepper
1-2 TBSP of olive oil

Directions

Preheat the oven to 400 degrees.  Wash and trim your Brussels sprouts of any yellow leaves.  Cut the large sprouts in half and leave the small ones whole. Place them on a cookie sheet and toss with olive oil, salt and pepper.  Put your sprouts cut side down and place the cookie sheet in the oven.

Boil the 2 1/4 cups of water and add the rice and butter.  Cook until tender.

While the sprouts and rice are cooking, start working on your pork chops.  Bring your olive oil to medium high heat in a large skillet.  On a plate mix the flour, salt, pepper, and garlic powder.  Coat each pork chop in the flour mixture and add the chops to the hot oil.  Cook the chops for about 4 minutes on each side or until they are just cooked through.  Remove the chops from the pan and allow them to rest.  Take your rice and add it to the pan you cooked the chops in.  Stir the rice and scrape the brown bits from the bottom of the pan.  Enjoy!!


Monday, October 14, 2013

Breakfast...It's What's for Dinner

Oh no!! It's Monday night.  I am starving.  I am tired.  I have no meat defrosted.  What are we going to eat? 
When nights like these occur, I sift through my fridge and pantry searching for inspiration.  I found eggs...mmm...bacon...mmm... breakfast!! Where are my grits...what!?! No grits!! (Common problem)  I will just have to improvise.

Rosemary Polenta with Bacon and Eggs

Creamy polenta with crunchy bacon and a fried egg? Can there be anything better?  I can't tell you how difficult it was for me to refrain long enough to take a picture of this last minute meal.


Just  few ingredients this time...because this is practically all I had at my house.  I used yellow cornmeal for my polenta, but feel free to use correctly labeled "Polenta" from the store.  It is a little more coarse, but not as coarse as grits.  All the polenta calls for is cornmeal, parmesan, rosemary, chicken stock, and milk.  


But, this meal starts with bacon.  I cooked my bacon up on the stove-top because later I am going to fry my eggs in the bacon juice.  When ingredients are few, the flavor must be big!!


I used about three sprigs of rosemary.  Strip the rosemary needles from the stem and finely chop them.  By this point, your bacon is sizzling in the pan and popping to grab your attention.


Time to flip!  Once the bacon is nice a crispy brown, remove it from the pan and allow it to drain on a paper towel.

While the bacon grease is still hot, crack two eggs into the skillet until the whites have set and the yolk is still runny.  Now, I made us two eggs a piece.  I won't stop you if you are going to be stingy and only eat one egg, but Matt already gives me a hard time about just letting him eat two pieces of bacon when we have ten more in the fridge.  Like the old saying goes, "Two is better than one."


In a small pot, heat about 1-1 1/2 cups of chicken stock until boiling.


Reduce the heat to simmer and slowly add 1/3 cup of your cornmeal while whisking to prevent the cornmeal from making lumps.


Let there be polenta.  Polenta, my dad always reminds me, means mush in Italian.  So, when that fancy restaurant tries to charge you $30 for Jumbo Shrimp over Polenta with a White Wine Demi-glaze, ask them what polenta means and try to get a discount.  It has never worked for me, but maybe you will have better luck!


Add 1/3 a cup of parmesan, rosemary, salt, and pepper.  Mix everything together thoroughly.


My polenta was not as creamy as I envisioned, so I added a splash of milk to give it that silky texture.


Perfect!!  Now to build your dinner.  Dish your polenta into shallow bowls and top it with bacon and eggs.


I hope you enjoy this super comforting, super easy, super pleasing, rib-sticking weeknight dinner.  Brinner is always one of my favorites, but when it turns out this beautiful, it is just a bonus.  

Ingredients:
4 pieces of bacon
4 eggs
3 sprigs of Rosemary
1/3 cup of Parmesan cheese, shredded
1/3 cup of cornmeal
1-1 1/2 cups of chicken stock
A splash of milk

Directions:
Heat a large skillet over medium high heat.  Cook 4 slices of bacon until brown and crunchy.  Remove the bacon to a paper towel for draining.  To the hot skillet, crack your eggs and fry sunny side up.  Cook the eggs in batches if necessary.  Remove the eggs from the skillet when the whites are set and the yolk is still runny.

In a small sauce pan, add your chicken stock and bring to a boil.  Add your cornmeal to the chicken stock while whisking to prevent lumps from forming.  Add a pinch of salt and pepper.  Whisk everything until it has come together and is coming away from the edges of the pan.  Sprinkle in your parmesan and rosemary.  Stir to combine.  Add a dash of milk to the polenta immediately prior to serving.

Wednesday, October 2, 2013

Anxiety

This is a time of change in my life.  In a few short months, I will be finishing dental school.  I am applying for a residency which may take me anywhere from Naples, Florida to Richmond, Virginia.  I am transitioning from having learned a lot of dentistry to learning how to run a business.  All of these things are new to me, and with new things comes new feelings.  These feelings range from excitement on some days to anxiety and stress on other days.

I have always been somewhat of an anxious person.  I like to think that I hide it well, but my family and my very closest friends know that I struggle with these demons.  Even when I was a little girl, I would lay down for bed at night and my mind would start racing and work me into a panic.  I think back to that time and wonder what I could have possibly had to worry about.  Obviously, I made it to the next day and the day after that and God carried me through every step of the way.

As I am meeting new people through my patient pool, I come to learn very intimate details through taking health histories or our conversations while waiting for the faculty to check my work.  There is a common theme of anxiety, whether it be for the changes that are happening at our nation's capital, financial problems, family issues, or anxiety for the sake of anxiety itself.  I have discovered I am more of "the norm" than I thought I was.

Just like when I was a little girl, I still get nervous and a lot of the time, it is for no reason whatsoever.  I realized through my "Eye episode" as I am beginning to call it, that I am a planner.  I like to know what I am going to do today, tomorrow, and the next five years.  When things do not go according to this plan, this is when the pit in my stomach forms and my heart beats a little faster.  We had a sermon a few weeks ago where our pastor began talking about this exact subject.  He said, "The root of anxiety is our mistrust in God's perfect plan." He also said that we like the idea that we have control over our situation.  I agree with his statements, at least it rings true in my own life.  God has blessed me so richly; how could I not trust Him to do what is best for me and his kingdom?

As I look back through my few years of life, I see anxiety in going to a new school where I knew hardly anyone.  I see anxiety in college about whom I should date and associate myself with.  I see anxiety in attempting to get into dental school my first time around.  I see anxiety with each benchmark I have had to surpass throughout dental school.  And then, I look to God.  Each situation has occurred according to His plan.  Of this I am certain.  Every plan that I have worked up as the best plan for myself has not compared to what God has laid out for my life.

In these times where I get nervous over some insignificant thing, I think back to when I was a little girl lying in bed worrying.  My sweet Daddy would come sit on my bed and sing beautiful old hymns.  I remember drifting asleep to the sounds of "I Love You, Lord" and "It is Well With My Soul."  Whenever my parents catch me worrying, they give me verses that comfort me and submerge me with prayer.  One of my favorite passages to meditate over is Philippians 4:6-7.

"Do not be anxious about anything, but in every situation, by prayer and petition, with thanksgiving, present your requests to God.  And the peace of God, which transcends all understanding, will guard your hearts and your minds in Christ Jesus."

Although there are many of things in this life for us to worry and obsess over, I am learning to leave my fate in His hands and being open to the opportunities He places in my path.  I have no idea what I will be doing in the future, but I have faith that it will be wherever God wants me.

Friday, September 20, 2013

My Favorite Sandwich: Avocado BLT's

I am constantly trying to find quick and tasty weeknight meals and a good sandwich is one of my favorite choices (and Matt's too).  For men, there is something about shoving things between two pieces of bread, not using silverware, and stuffing it in their mouth.  Matt could eat a sandwich for every meal, and it hardly matters what is between those pieces of bread.  We regularly have tomato and mozzarella grilled cheese, left over deer meat with spinach and mustard, and chicken salad with cranberries.  But this is my absolute favorite!  It has everything that I love and it is only five ingredients.  Does it get any easier than that??

Avocado BLT's


How fantastic does that sandwich look??  And those fries??  I would be more than happy to pay $10-12 if I was served this at a restaurant.  You can make four sandwiches at home with fries for around $5.  That is my kind of meal!


I am going to let you in on one of my secrets to a great sandwich.  Get yourself some good bread.  I have tried so many kinds of bread to please my sweetie, but his absolute favorite is this 9 grain and seed bread from the Kroger deli section.  I am hoping I do not regret letting y'all know about this bread because there are only a few loaves there every week.  Please save me a loaf if they are going like hotcakes!


Cut your bread into slices.  This bread has fantastic texture.  Look at all of that flaxseed, sunflower seeds, and millet!  The seeds add a crunch and the inside is soft and fluffy.


Grab an avocado and cut it in half.


Is there any color more gorgeous than avocado?  It is just such a lovely color green and how it graduates from a dark green to light...lets just say it inspires me.  I could create a whole kitchen based on an avocado, and I just might one day.


 Scoop out the avocado into a bowl and add pepper.  I did not add salt because A.) we try to not eat too much salt in our diet and B.) the bacon is salty enough to where you do not miss it.


Cook yourself up some bacon in whichever way you like to make it.  My mom uses the microwave method, I use the stovetop method, and you can even use the oven method.  I used two slices of bacon for each sandwich.


Mash up your avocado.  I would recommend doing the whole avocado cutting and mashing as close to serving the sandwich as possible.  Avocados oxidize very quickly and turn an unappetizing brown color.


Assemble your sandwich.  First, layer some of your avocado on your bread.  Take a few tomato slices and place them lovingly on top of your avocado.


I believe I can hear the angels singing.  Next comes the bacon!  At this point, I start feeling like that dog on the Beggin' Strip commercials.  It's BACON!!!


The final step is to apply some lettuce to your creation.  I used spinach because that is what I had on hand.  Mixed greens or Romaine lettuce would be delish too.  Top your sandwich with your last slice of bread and dinner is done!


But wait...there were fries in that picture!  I want fries!  I want fries!  I want fries!
Okay, okay, calm down.  These are my crispy baked fries.  They are one of my favorite sides, and I usually start out the meal by making these first so they finish baking while I am assembling my sandwich.  Preheat your oven to 400 degrees.  Take one potato for each person and scrub all of the grit off of its skin.


Cut your potato into long slices.  FYI: The skinnier the slices, the quicker the fries cook.


Cut each slice into fries.  A really quick way of doing this is by purchasing a kitchen appliance called a Mandoline.  I have one, but I must have had a rough day and needed to chop something.  Woah... that sounded creepy.  No judging!  Cooking is my therapy!


Take a cookie sheet and for easy clean up, lay a sheet of tin foil down.  Spray the foil with non-stick spray to prevent the fries from sticking.


I use different seasonings on my fries every time I make them.  I use whatever I have in abundance in my garden.  In the winter I use dried herbs, but in the summer, fresh herbs really kick these fries up a notch.  Here I used fresh chives.


Put your fries on the cookie sheet.  Add your chives, 2 minced cloves of garlic, salt, and pepper.  Drizzle your fries with olive oil.


Toss everything together and get the fries in a single layer.  Otherwise they will not brown correctly.  I have found that a cookie sheet's limit is two potatoes.  If I am cooking for a crowd, I used two cookie sheets.  If you don't then the fries will steam and not crisp up.


Let the fries cook for about 20 minutes.  Toss the fries and put them back in the oven for another 10 minutes or so.  And now you have delicious, fragrant baked fries that you will never guess were baked.  


Two recipes in one!  I hope you enjoy your easy, inexpensive weeknight dinner.  And don't forget what I said about the bread!  If I show up at Kroger next week and all my bread is gone, I will be so sad.

Ingredients:
BLT per sandwich:
2 slices of bread
2 slices of bacon
2-3 slices of tomato
1/2 avocado
Spinach leaves

Bakes Fries:
2 Russett potatoes
2 minced garlic cloves
2 TBSP of chives
1-2 TBSP of olive oil
Salt and pepper

Directions:
BLT: Cook your bacon until preferred doneness.  Slice your tomatoes.  Cut your avocado and scoop the flesh into a bowl.  Add some pepper to your avocado and mash it until creamy.  Assemble your sandwich by adding avocado to the bottom slice of bread, add the tomato slices, followed by the bacon, then spinach.  Add your top slice of bread to top off your sandwich.

Fries: Preheat your oven to 400 degrees.  Cut your potatoes into fries and cut your herbs.  Add the potatoes, herbs, salt, pepper, minced garlic and olive oil to your cookie sheet.  Toss everything together.  Bake for 20 minutes and toss the par cooked fries.  Return to the oven and cook for another 10 minutes until crispy.