Followers

Friday, September 20, 2013

My Favorite Sandwich: Avocado BLT's

I am constantly trying to find quick and tasty weeknight meals and a good sandwich is one of my favorite choices (and Matt's too).  For men, there is something about shoving things between two pieces of bread, not using silverware, and stuffing it in their mouth.  Matt could eat a sandwich for every meal, and it hardly matters what is between those pieces of bread.  We regularly have tomato and mozzarella grilled cheese, left over deer meat with spinach and mustard, and chicken salad with cranberries.  But this is my absolute favorite!  It has everything that I love and it is only five ingredients.  Does it get any easier than that??

Avocado BLT's


How fantastic does that sandwich look??  And those fries??  I would be more than happy to pay $10-12 if I was served this at a restaurant.  You can make four sandwiches at home with fries for around $5.  That is my kind of meal!


I am going to let you in on one of my secrets to a great sandwich.  Get yourself some good bread.  I have tried so many kinds of bread to please my sweetie, but his absolute favorite is this 9 grain and seed bread from the Kroger deli section.  I am hoping I do not regret letting y'all know about this bread because there are only a few loaves there every week.  Please save me a loaf if they are going like hotcakes!


Cut your bread into slices.  This bread has fantastic texture.  Look at all of that flaxseed, sunflower seeds, and millet!  The seeds add a crunch and the inside is soft and fluffy.


Grab an avocado and cut it in half.


Is there any color more gorgeous than avocado?  It is just such a lovely color green and how it graduates from a dark green to light...lets just say it inspires me.  I could create a whole kitchen based on an avocado, and I just might one day.


 Scoop out the avocado into a bowl and add pepper.  I did not add salt because A.) we try to not eat too much salt in our diet and B.) the bacon is salty enough to where you do not miss it.


Cook yourself up some bacon in whichever way you like to make it.  My mom uses the microwave method, I use the stovetop method, and you can even use the oven method.  I used two slices of bacon for each sandwich.


Mash up your avocado.  I would recommend doing the whole avocado cutting and mashing as close to serving the sandwich as possible.  Avocados oxidize very quickly and turn an unappetizing brown color.


Assemble your sandwich.  First, layer some of your avocado on your bread.  Take a few tomato slices and place them lovingly on top of your avocado.


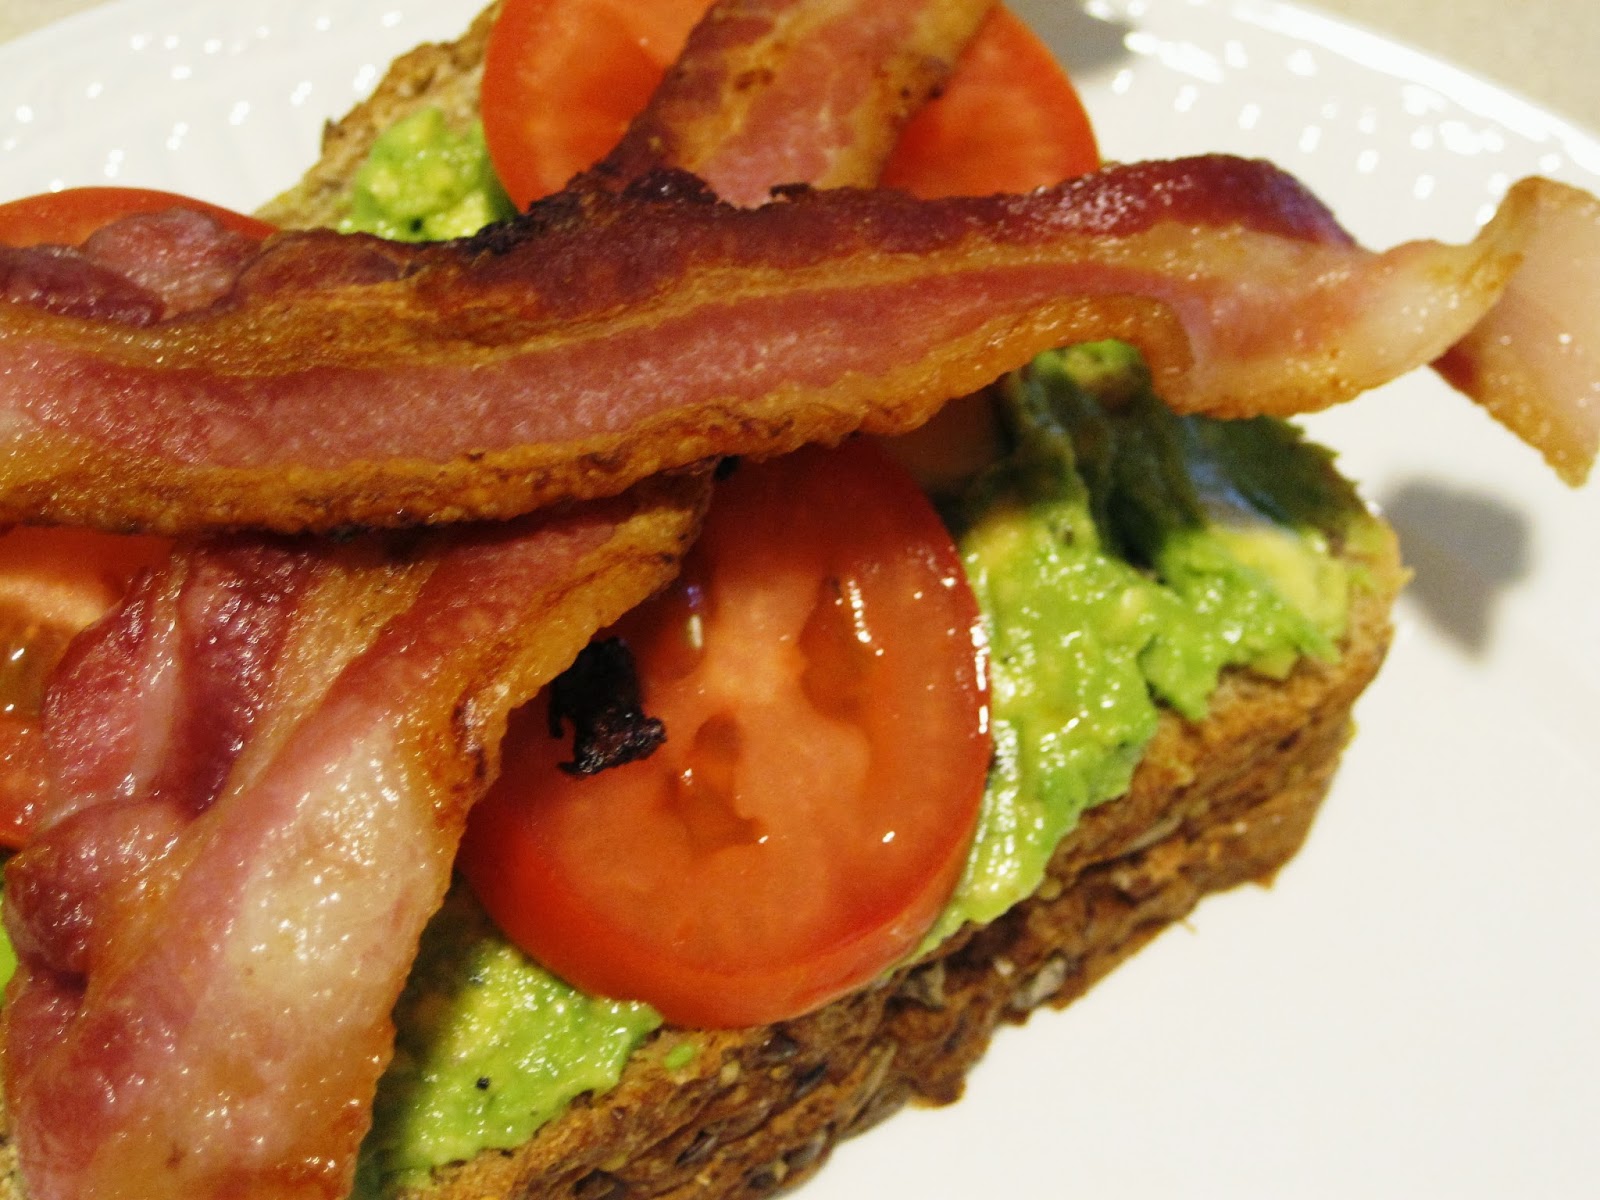
I believe I can hear the angels singing.  Next comes the bacon!  At this point, I start feeling like that dog on the Beggin' Strip commercials.  It's BACON!!!


The final step is to apply some lettuce to your creation.  I used spinach because that is what I had on hand.  Mixed greens or Romaine lettuce would be delish too.  Top your sandwich with your last slice of bread and dinner is done!


But wait...there were fries in that picture!  I want fries!  I want fries!  I want fries!
Okay, okay, calm down.  These are my crispy baked fries.  They are one of my favorite sides, and I usually start out the meal by making these first so they finish baking while I am assembling my sandwich.  Preheat your oven to 400 degrees.  Take one potato for each person and scrub all of the grit off of its skin.


Cut your potato into long slices.  FYI: The skinnier the slices, the quicker the fries cook.


Cut each slice into fries.  A really quick way of doing this is by purchasing a kitchen appliance called a Mandoline.  I have one, but I must have had a rough day and needed to chop something.  Woah... that sounded creepy.  No judging!  Cooking is my therapy!


Take a cookie sheet and for easy clean up, lay a sheet of tin foil down.  Spray the foil with non-stick spray to prevent the fries from sticking.


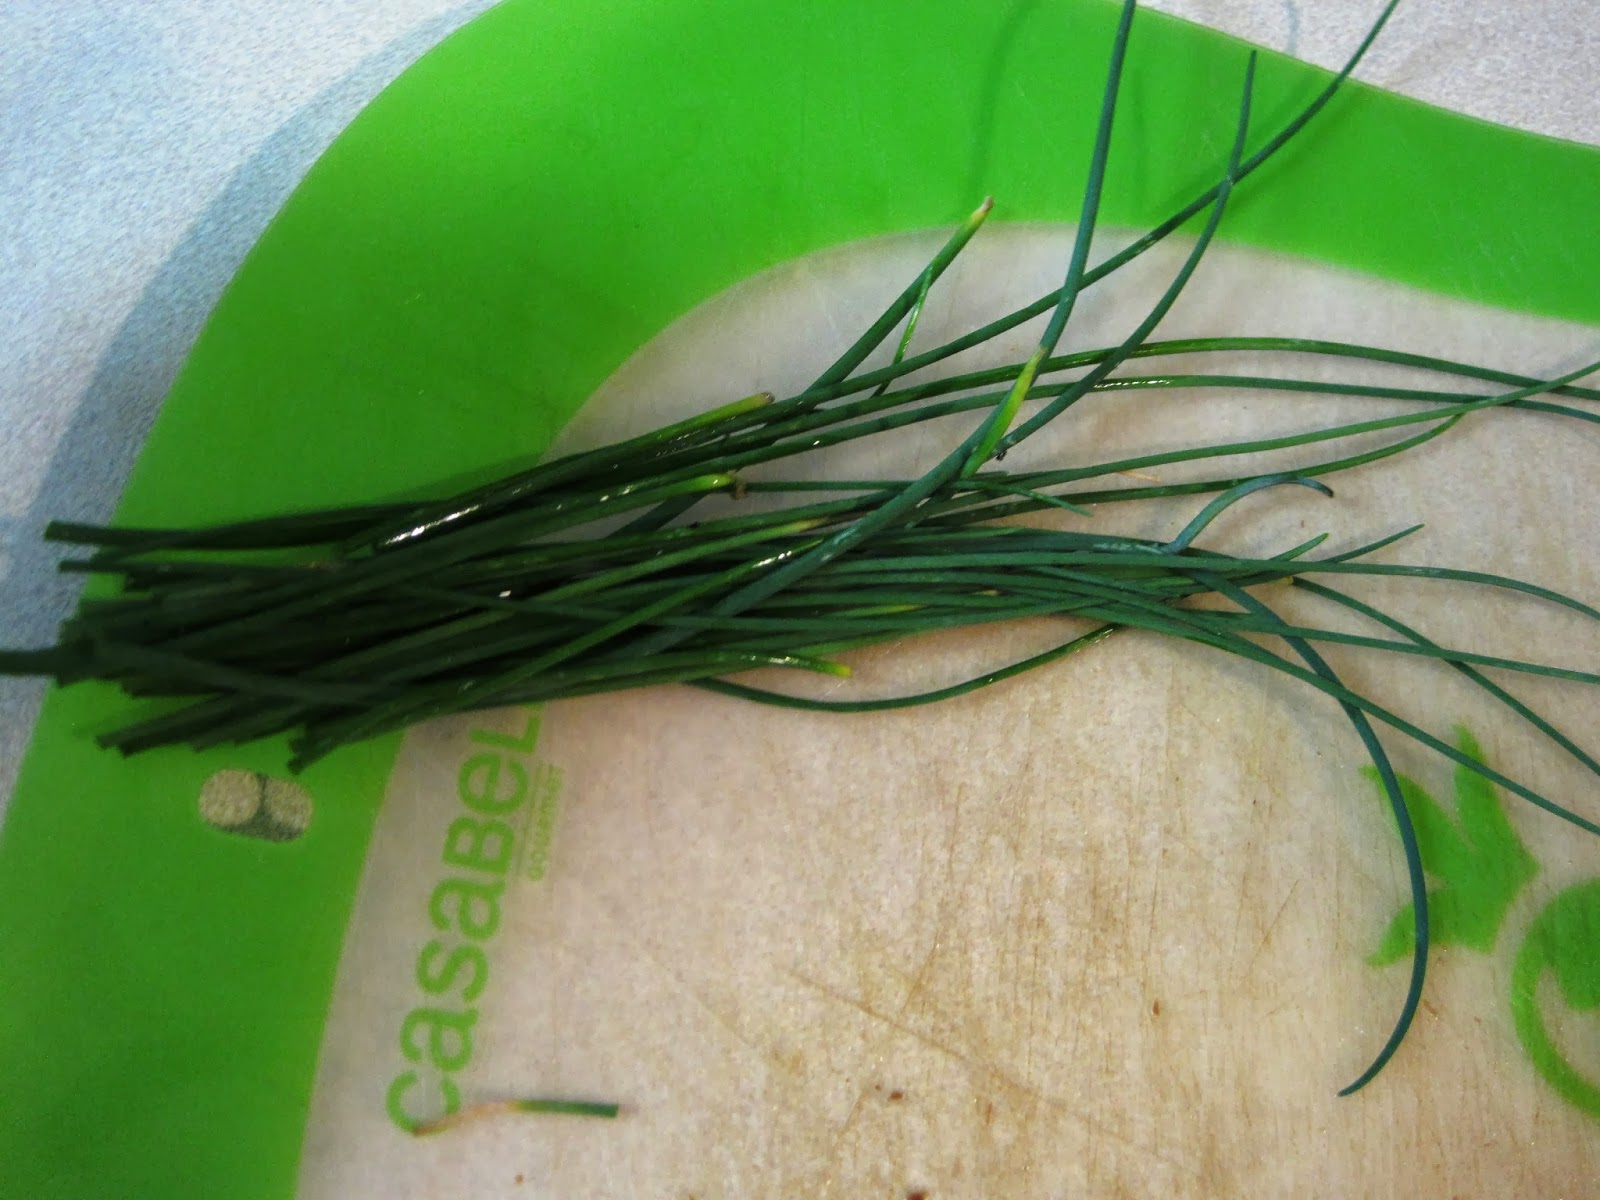
I use different seasonings on my fries every time I make them.  I use whatever I have in abundance in my garden.  In the winter I use dried herbs, but in the summer, fresh herbs really kick these fries up a notch.  Here I used fresh chives.


Put your fries on the cookie sheet.  Add your chives, 2 minced cloves of garlic, salt, and pepper.  Drizzle your fries with olive oil.


Toss everything together and get the fries in a single layer.  Otherwise they will not brown correctly.  I have found that a cookie sheet's limit is two potatoes.  If I am cooking for a crowd, I used two cookie sheets.  If you don't then the fries will steam and not crisp up.


Let the fries cook for about 20 minutes.  Toss the fries and put them back in the oven for another 10 minutes or so.  And now you have delicious, fragrant baked fries that you will never guess were baked.  


Two recipes in one!  I hope you enjoy your easy, inexpensive weeknight dinner.  And don't forget what I said about the bread!  If I show up at Kroger next week and all my bread is gone, I will be so sad.

Ingredients:
BLT per sandwich:
2 slices of bread
2 slices of bacon
2-3 slices of tomato
1/2 avocado
Spinach leaves

Bakes Fries:
2 Russett potatoes
2 minced garlic cloves
2 TBSP of chives
1-2 TBSP of olive oil
Salt and pepper

Directions:
BLT: Cook your bacon until preferred doneness.  Slice your tomatoes.  Cut your avocado and scoop the flesh into a bowl.  Add some pepper to your avocado and mash it until creamy.  Assemble your sandwich by adding avocado to the bottom slice of bread, add the tomato slices, followed by the bacon, then spinach.  Add your top slice of bread to top off your sandwich.

Fries: Preheat your oven to 400 degrees.  Cut your potatoes into fries and cut your herbs.  Add the potatoes, herbs, salt, pepper, minced garlic and olive oil to your cookie sheet.  Toss everything together.  Bake for 20 minutes and toss the par cooked fries.  Return to the oven and cook for another 10 minutes until crispy.

Thursday, September 5, 2013

Friendship Cookies

Let me start off by saying, baking is not my thing.  It is simply something you have to have a feel for, and lets just say, I don't got it!  This is why you so rarely see a dessert on this blog.  To branch out from my pastas and pizzas, I decided to throw in these delectable cookies.  

Several weeks ago, my dear friend, Sara invited Matt and me over for dinner with her and her sweet boyfriend, Dustin...wait...Justin...no, Dustin.  (Sorry, a little inside joke).  I asked if I could bring anything, and she suggested a dessert.  So, naturally, the whole week I planned and planned what I was going to bring.  Just kidding!  That is not exactly what happened.  I get home from school Friday and realize I have completely forgotten I was supposed to bring a dessert!

In a panic, I dig through my pantry to see what I have that could possibly whip something up with.  And that, my friends is how I came up with my Friendship Cookies.  They have that comforting, buttery flavor with chocolate, nuts, and coconut smattered throughout.  All of my favorite things mixed into one, just like my dear friend, Sara.

Friendship Cookies


One thing I decided I really needed to invest in is a cookie scented candle.  The smell of cookies baking in the oven is probably on up there in favorite smells with the first fire in the fireplace and flowers blooming to announce the start of spring.  


Add one cup of flour to a bowl along with 1/2 a teaspoon of salt and baking soda.  Wisk the dry ingredients together.


In a mixing bowl add 1 stick of butter, 1/2 cup of granulated sugar,1/2 cup of light brown sugar and a dash of vanilla extract.


Mix the butter/sugar mixture until it is creamy 


Add one large egg to the butter/sugar and mix until well combined


Although it doesn't look like it is on low, turn your mixer on low and gradually add the flour.


This is the part where I tell you to take the mixing paddle out and do not lick the batter off because there is raw egg in the dough... but I won't tell on you if you won't tell on me!


Sad dough with nothing in it :(((


Add 1 cup of semi-sweet chocolate chips (or chunks if you prefer)


Sprinkle in 1/3 a cup of shredded sweetened coconut.  Coconut is not a typical ingredient that I use (which is why it was left over in my pantry, I am sure), but it adds a really good texture to these cookies without adding too much coconutty flavor.


Finally, add 1/3 cup of chopped walnuts.  Mix your morsels into the dough until they are well combined.  You will have a hearty dough with speckles of deliciousness all throughout.


Spoon out generous lumps to make very large cookies.  Tip: Small cookies are just not appropriate unless they are for a wedding/baby shower where girls feel better about eating 5 or 6 small cookies instead of 2 large cookies.


Please do not judge me if I happened to sneak a cookie dough ball before they hit the oven.


After you have let the cookies bake in a 375 degree oven for 12-15 minutes, they will have magically transformed into the ooey, gooey cookies that will be a delightful finish to any meal.  These cookies are too good to keep to yourself!  Grab your best girlfriend and share stories of the good ole days.  Don't forget the milk!


Dear, sweet Sara!  We have shared so many fun times together and I am so grateful for your friendship.  Whether it be watching the Secret Garden, rooming together at formals, having wrecks, dressing up in Aunt Fannie's clothes, crying over heartbreaks, or laughing over lizard tongues, we always have the best time and I love you very much!

Ingredients
1 cup of flour
1 stick of butter (1/2 cup, unsalted and softened)
1/2 teaspoon of baking soda
1/2 teaspoon of salt
dash of vanilla extract
1 large egg
1 cup of semi-sweet chocolate chips
1/3 cup of shredded coconut
1/3 cup of chopped walnuts

Directions
Preheat your oven to 375 degrees.  To a medium bowl, add your flour, salt, and baking soda.  Wisk the dry ingredients together.

In the bowl of a stand mixer (or a large bowl with a hand mixer), add the butter, sugars, and vanilla.  Mix until thoroughly combined.  Add 1 large egg to the butter/sugar mixture and mix together.  Add the chocolate chips, coconut, and walnuts to the bowl.  Stir together until everything is evenly dispersed.

Spoon out large drops of dough onto a cookie sheet.  Bake the cookies for 12-15 minutes or until the tops begin to brown.  This recipe makes about 15 cookies.


Monday, August 19, 2013

Babba's Mac and Cheese

I was blown away by all of the wonderful comments and words of encouragement that I received after my last post.  Thank you all so much for the kind words, thoughts, and prayers.  Because I had such a huge response last time, I didn't know what to blog about next.  There is no way I can top the emotional rollercoaster of my last post, so I chose something that has been more consistent in my life.  

I was so blessed in college to have a really tight-knit group of girlfriends.  We became friends the first weekend of school during Katrina, and we have stayed friends since then.  The girl who brought me into this friend group is my dear, beautiful friend, Sarah Beth.  We have been through so much over our years together.  We have brushed our teeth together, we have camped together, we have rolled down hills together, we have laughed and cried together.  I thought it was only appropriate to post a few pics from our journey.


This is SB and me at her gorgeous wedding...well, waiting in the dressing room.  It was a fantastic night and probably the most beautiful reception I have ever been to.  A few months after SB's wedding, the girls got together for dinner, and as girls, we talked about girly stuff like significant others, work, and the conversation led to recipes.  Sarah Beth said she made her Babba's (grandmother) mac and cheese all the time.  She told me that it is a really easy, good recipe.  She gave me the recipe, and I waited...and I waited... and I waited.  I was too scared to make a recipe that someone's Babba had made!  No one can make food better than Babba.  Finally, a few weeks ago, I made it, and it is probably the most delicious thing I have ever created.  I am not exaggerating.  Matt took a few bites and finally slammed down his fork and said, "Everything else on this plate is crap and I don't want to eat it so I can eat more mac and cheese."  This is Babba's Mac and Cheese.

 Babba's Mac and Cheese


Don't be afraid!  You can do it.  Not just Babba's can make something delicious!


The star players are macaroni, cheddar, 2 eggs, milk, salt, pepper, and paprika.  That's it!  Does it get any easier?  You probably have all of these things in your kitchen waiting on you.


Firstly, you must cook your pasta according to the package directions.  Use 8oz of macaroni, which I found to be about 2 cups.


While your pasta is cooking, lightly beat your eggs.  Add 1 1/2 cups of milk to the lightly beaten eggs. 


Stir in 1 teaspoon of salt and 1/8 teaspoon of pepper to your milk/egg mixture.


Drain your pasta and grab a 9x9 casserole dish.  Spray the dish with non-stick cooking spray.


Layer 1/3 of your noodles on the bottom of the dish


Sprinkle 1/3 of the cheddar cheese on top of the pasta


Add another 1/3 of the noodles, followed by 1/3 of the cheese


Add the last 1/3 of the noodles and RESERVE the rest of the cheese for later.


Pour your egg/milk mixture over your macaroni


Cover your delicious mixture and put it in a 350 degree oven for 30-45 minutes.  


Remove your casserole dish from the oven and uncover it.  Now it starts getting difficult...the smell starts overwhelming the other senses, and you will become basically useless.


Cover the mac and cheese with the last 1/3 of the cheese and sprinkle the top with paprika.  Let the mac and cheese stand for 10 minutes to melt the cheese.  Honestly, I did not make it quite 10 minutes.  I found a shovel and started pouring cheese and pasta and  I think a little bit of cocaine into my mouth.  I could not stop.  Okay, that may have only happened in my fat kid brain, but sometimes I really miss that kid.  


I am honestly surprised that I got a picture of this without a fork it in it, because it really was devoured shortly after.  Matt actually said, "This is hands down the best macaroni and cheese I have ever had."  So with all of this said, I do not have to say, I hope you enjoy, because I know you will.  This is not a suggestion.  Make this recipe and enjoy!

Ingredients
8oz of macaroni
2 1/2 cups of shredded cheddar
1 1/2 cups of milk
2 eggs lightly beaten
1 tsp salt
1/8 tsp pepper
paprika

Directions
Preheat oven to 350 degrees.  Cook pasta.  Layer 1/3 of the noodles in a lightly greased casserole dish.  Sprinkle with 1/3 of the cheese.  Repeat layers.  End with the noodles.  Pour over the milk mixture.  Bake covered at 350 degrees for 30 to 45 minutes.  Uncover and top with cheese and paprika.  Let stand for 10 minutes.


Thursday, August 1, 2013

I Was Blind, but Now I See

Usually these blog posts are easy for me to whip up.  Make something yummy.  Take a few pictures.  Tell everyone how I did it.  Done!  This is not going to be so easy.  I have shied away from talking about myself on these blogs due to the fact that I simply don't think my life is interesting enough for people to want to read about it.  But, last week an event flipped my world upside down and with so many of you praying for me, I felt it was necessary to share how God shook my world.  It is not a story about me; it is a story about what God did in my life, and I can be okay telling a story about that.

Let me set the stage.  A few weeks ago, I was at max stress level.  I am currently working on applying for a residency, studying for our National Dental Boards, writing a research abstract, and in school from 8-5.  The stress was apparent in my work.  I went a whole week with absolutely nothing going right on a single patient.  By Thursday afternoon, I did not think anything about the intense muscle pain I was experiencing over my eyes.  It hurt to move my eyes quickly, but I knew it was simply the strain that my eyes had been experiencing throughout the week.  When I woke up Friday morning, I began noticing a hazy spot obstructing part of my vision in my right eye.  It progressively got worse, so I do what I always do in situations like this.  I call my dad.  I was trying to not make a big deal of it, but the fact that he sounded more worried than I did made me nervous.  Usually when I call to tell him an ailment, he automatically tells me what it is and when it will go away.  This was new for me.

He started making calls to see if any of his ophthalmology friends could see me Friday night.  Dad was able to get in touch with his friend, Dr. Bill Ashford.  I hated being that patient that calls on a Friday afternoon to ruin the doctor's weekend, but Dr. Ashford was so kind and caring.  He examined my eyes and said he thought it was just muscle weakness and should get better over the weekend.  By Sunday, I could barely make out shapes in my right eye.  I saw Dr. Ashford on Sunday morning where he diagnosed me with Optic Neuritis.  Immediately when he said this my tongue caught in my throat and my heart dropped to my stomach.  Optic Neuritis triggered Multiple Sclerosis to pop in my head.  I asked Matt to look on his phone to see if I was right...I was.

With having so many doctors in my family, they already knew before I did that I might have multiple sclerosis.  I was the one that was slow to catch on.  This was why dad was so worried.  This is why mom kept calling hoping my vision had gotten better.  God, no!!!!  Multiple sclerosis is where plaques develop in the brain and spinal cord and prevent communication between the brain and the extremities.  With me becoming a dentist in the next year, this was devastating news.  I had my whole life planned out.  I was going to do a residency in Pediatrics next year.  Have a baby two years after that.  Move back to Jackson and start a practice.  Have another baby.  Work for 20-30 years, retire, and spend a wonderful, leisurely life with my wonderful husband.  My plans began to crumble and fall through my fingers like sand.

I was admitted to the emergency room on Sunday and the testing began.  I was told that I needed to be put on IV steroids and was going to have to stay in the hospital for the week.  I have never been so scared in my whole life.  If any of you know me, I like to be busy.  The worst part of the situation was I was lying around for 23 hours out of the day with nothing to think about except what my future held.

I looked to Matt's sweet face next to me.  I could not ask this loving man to give up so much of his life to taking care of me in the future.  I know he would do it unbegrudgingly, but he deserves better than that.

I looked to my Mom's hand who was holding mine.  She is my biggest cheerleader who had always been there to encourage me when I was called mean names or was told I was not smart enough to make it to dental school.

I looked to my Dad's sad eyes wishing he could stop this.  He was my protector who did everything he could to shield me from the pain of this world.

I looked to my brothers who were doing everything they could to lighten the mood and give me a bright outlook in this scary time.

For comfort, I pulled out my old leather Bible and searched its pages.  I came upon Mark 2, the story of Jesus healing the paralytic.  Jesus is preaching to a crowd and four men are attempting to get their paralyzed friend to Jesus for him to be healed.  They can't get through the crowd as much as they try.  They do not give up.  They take their friend up to the roof, break through the roof, and lower their friend at Jesus' feet.

I have always been the friend who will pray, who will fight, who will do anything to help a friend in need.  I have never been the paralytic.  I felt so helpless and out of control.  I have never had so many people praying for me and laying me at my Savior's feet.  I realized I never truly had control of my life...ever. Through our plans and goals, we create an illusion of having control of our lives and destiny, but God can change our lives in a heartbeat.

As the realization that I do not have control washed through my brain, the feeling of ultimate freedom replaced the fear I had been experiencing.  I became certain of several things: 1. God is in control. 2. I do not have to know all the answers. 3. Everything works for the will of my Father.

After this week of testing and waiting and learning and more waiting, I went back to my doctor to get all of my test results.  As I sat and waited for the doctor to tell me the news, I had a calm come over me.  God said "Trust me, child."  I could see my mom out of the corner of my eye, about ready to spring from her chair in anticipation.  When the doctor said, "All of your tests came back normal, so we think this is just an isolated event," I could barely believe my ears.  After many many prayers of thanksgiving, I am feeling back to normal and my vision is at 100% what it was before this episode.

I am so thankful for those of you who prayed for me and encouraged me through this.  I am proof that prayer does work and it gave me the strength to get through this ordeal.  Since we got the news, I can't keep the song It Is Well With My Soul out of my head.

"When peace like a river attendeth my way; 
When sorrows like sea billows roll; 
Whatever my lot thou hast taught me to say; 
It is well, It is well with my soul."