Followers

Thursday, June 14, 2012

French Country Omelet

It is time to showcase my herbs!!  They have absolutely gone crazy this summer, and it has been so fun using them to inspire new recipes.  Let me begin with chives.

Chives are probably one of the easiest herbs to grow.  When I bought my plant, I did research to see if there were any special growing instructions...Nope!  Plant.  Put it in a sunny place.  Watch it grow.  It was that simple!  It has a light onion-y taste that is best used to round out a dish right before you serve it.  It is usually used as a garnish, but my mom always mixes it with butter to put on rolls, steak, potatoes or practically anything.  It is divine!


I had a tough time deciding which recipe I was going to choose for my "chive" recipe, but I kept coming back to this one. I found it in an Ina Garten cookbook called Back to Basics, and trust me, it is very basic...but delicious.  When some people think of Ina, they think of expensive ingredients like truffle butter, soppressata, and gruyere cheese, but I probably spent less than 5 dollars on this entire recipe.  It is super easy, very comforting, and hardly any clean up... basically I just had to share it!


Coat the bottom of your pan with olive oil


While the oil heats up, measure out 1 cup of diced potatoes.  Ina suggests using Yukon gold potatoes, but I only had red potatoes on hand.  This was one large red potato.


Dice 3 slices of thick cut bacon, and put in your olive oil


In a medium bowl, crack five large eggs


Add 3 tablespoons of milk


1/2 teaspoon of salt


and 1/4 teaspoon of pepper


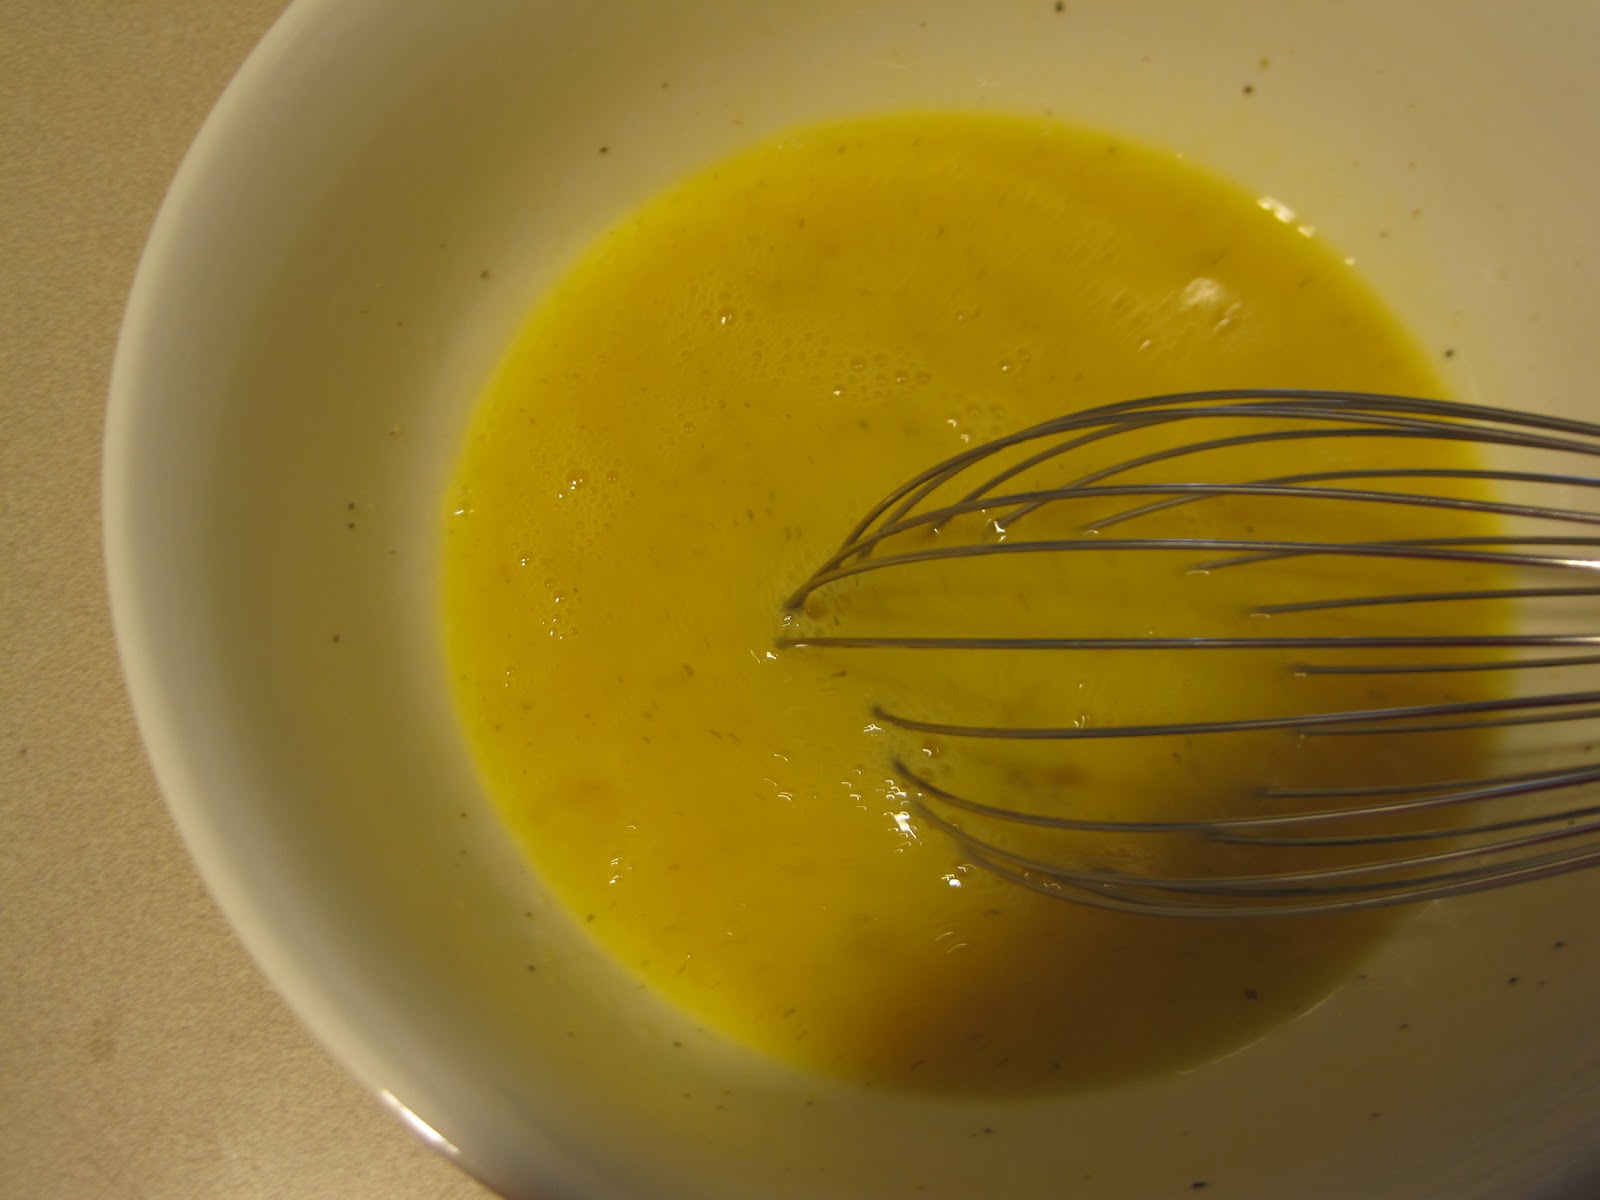
Wisk these ingredients together


Remove the bacon from the pan and place on a paper towel to drain.  Add the potato to the pan...


Let the potato cook until it is crisp and remove it from the pan as well.  


Cut 1 TBSP of unsalted butter


Remove the remaining fat in the pan and melt the butter in the pan.  Pour the egg mixture over the butter and stir in the bacon and potatoes.  Place the entire pan into the oven at 350 degrees for 8 minutes.


While the omelet is cooking, trim some chives and cut them into small pieces


Remove the pan from the oven and sprinkle the chives on top.


Look at those beautiful colors! 

Country French Omelet

1 TBSP of olive oil
3 slices of thick cut bacon, cut into 1 inch pieces
1 cup of diced red potato
Kosher salt and black pepper
5 extra-large eggs
3 TBSP of milk
1 TBSP of unsalted butter
1 TBSP of fresh chopped chives

-Preheat your oven to 350 degrees
-Heat olive oil in an ovenproof pan over medium heat.  Cut the bacon into 1 inch slices and put in pan.  Cook until crisp.  While the bacon is cooking, crack the 5 eggs into a medium bowl.  Add the salt, pepper, and milk.  Wisk the ingredients together and set aside.
-Remove the bacon from the pan and let it drain on a paper towel.  Cook the potatoes in the reserved bacon fat until browned on the outside and soft on the inside.  Remove the potatoes from the pan and drain the remaining fat.
-Place the butter in the pan and let it melt.  Pour the egg mixture into the pan and stir in the bacon and potatoes.  Put the pan into the preheated oven and let it cook for 8-10 minutes.
-Remove the pan from the oven and sprinkle the omelet with chives.

The omelet can serve two on its own or you can serve four with a side salad for a light lunch!


Wednesday, May 23, 2012

Bloomin' Onions

I hate to admit it, but I was born with a genetic defect in my thumb.  Speaking more specifically, I was born with a black thumb.  And it is not just me.  My mother has some wonderful talents, but even she will admit gardening is not one of them.  Thankfully, my husband's family are avid gardeners and have shed some light on this unknown world for me.

I figured I would start out easy with an herb garden, and I have to say that it is one thing in my life that really brings me joy.  It gives me such a sense of accomplishment to watch my little plants grow and also since one of my passions is cooking, I love that I get to use them in so many of my recipes.  As a matter of fact, I have been tossing around the idea of combining one of my herbs and things I have learned about it along with a recipe that I most use it for/showcases it best.  Sorry... getting ahead of myself.

The point is: my herbs make me happy.  Moving on...

One day as I was browsing through pinterest, I found a link that said "Never buy scallions again."  When I read the blog, I was shocked that I had not thought of it before.  Basically, all it said was to:

A. Buy scallions from your local grocery store (When I bought them from our Kroger, they were 69 cents for a bunch)
B. Put them in a glass of water by a sunny window for 3 days to root them
C. Plant them

Easy as that!  Mine have gone crazy!  I don't typically do this, but a few weeks ago I saw some buds appearing, and I just had to see what the flowers looked like.  Oh, and no... the scallions did not grow to the top of our fence.  That would be called an optical illusion, my friend ; )


I was telling my mom about growing these scallions, and she asked me the question, "Well, what if you want to use the white part of the onion?"  I have thought about this question for a week or so, and what I would do would be unroot the scallion, cut the top part of the scallion, leaving the bulb of the plant intact.  Next, I would replant the bulb with a little bit sticking out of the dirt, and wait for it to grow.

Friday, May 4, 2012

Homemade Bread


Hello.  My name is Emilee Milling, and I am addicted to carbs, but my serious love is bread.  It is always my favorite part of the meal whether it be yeast rolls, cornbread, southern biscuits, or Texas toast.  Over the years, I have tried to make my own bread several times, but I never got it quite right.  It was such a tedious process that took a huge chunk of time.  

I remember one time I wanted to make my then boyfriend, now husband some delicious homemade bread.  I worked all day on it, and when the bread came out of the oven it smelled wonderful.  With my excitement building, I drew out my bread knife and began to cut into the bread... It was hard as a rock.  Little did I know, but early on, my water had been too hot and killed my poor, little yeast friends.  Matt was a champ and told me how yummy it was.  "It's okay, sweetie.  You just have to chew a little more.  See?  It's good!" 

Earlier this year, I found a recipe for bread on the Le Creuset website that was so easy, anyone could do it.  Of course, I didn't believe them, but thought it might be worth a try, and an added bonus, I got to use my new Le Creuset pots I got for wedding presents.  I realize that not everyone has these enameled cast irons because they are pretty pricey.  I found a few that are a different brand that are not quite expensive, and I am sure, work just as well.  You can find them at Belk that are Cooks Tools brand or at Target by the wonderful Giada DeLaurentiis, and they are around $70.

I use this bread to make sandwiches and also for a quick breakfast.  I actually don't even buy bread from the supermarket anymore.  It is that good!  Matt and I went to a work party, and all of his co workers knew me as "the girl who makes the bread!"  When I asked him about it, he said, "I am the envy of everyone in the lunch room.  They always comment on how good my lunches look."  So here is the recipe that is the secret to my wifey success:


Put 3 cups of flour to a large mixing bowl


Add 1 3/4 teaspoons of salt and...


1/2 teaspoon of yeast.  
Wisk the dry ingredients together until they are well mixed.  Now, this decision is up to you.  You can add 1 1/2 cups of water, and you have a really good, basic bread recipe.  I have a tendency to get bored with plain bread, so I add in things that I love to enhance the bread.


This bread has a clove of garlic and cheddar cheese,


This bread has cinnamon, orange zest, and dried blueberries

Cover the bowls with plastic wrap and let it rise for 12-18 hrs.  I usually mix everything up the night before I bake the bread.  It literally takes 5 minutes to stir everything together.  The next morning, I bake our beautiful creation.  The smell of fresh bread is a wonderful start to the day!


Put your empty cast iron pans into the oven at 450 degrees for 30 minutes to make sure the bread is cooked evenly.


Poof!  It rose!  It still surprises me


Hey! So did this one!


Now take a second to smell your bread at this stage... oh my goodness, it smells fantastic!


Look at all of those lovely specks of cinnamon floating around in there


Sprinkle a cutting board or counter with flour


Pour your dough onto the floured surface


and form a loaf.  Don't you feel like a professional baker?


Place your dough into your preheated cast iron pot and cover it


Do the same thing with your other loaf if you are making two


Bake your bread with the lid on for 30 minutes


This part is always a tease.  It looks good enough to eat, but you can't do it yet!


Take the lid off and bake it for another 10 minutes


Perfection!


This bread looks so crispy and there is absolutely no oil or butter!  I still have no idea how it gets this crispy!


Place your loaves on a cooling rack.  If you let the bread cool all the way before cutting it, the bread will stay moist longer, but if you just cannot wait, I totally understand.  In my case, the bread is eaten way before it gets a chance to dry out.

Homemade Bread
3 cups of flour (all purpose or unbleached bread flour)
1 3/4 tsp of salt
1/2 tsp of yeast
1 1/2 cups of water

In a large bowl, mix together the flour, salt, and yeast.  Pour in the water and if you are adding anything, put it in now.  Stir everything until you get a continuous mixture.  Cover the bowl with plastic wrap and let it rise for 12-16 hours.  
Preheat your oven to 450 degrees.  Put your cast iron in the oven for 30 minutes.  Remove the dutch oven and put the dough in the pan with the lid on top.  Bake for 30 minutes.  Take the lid off and continue to bake for 10 more minutes.  Remove from the oven and place on a wire cooling rack.

These are a few combinations I have tried that have been super delicious:
Dried cranberries and orange juice/zest
Cinnamon raisin bread (I also added about 1/4 cup of brown sugar)
Rosemary, asiago cheese, and lemon zest
Lemon zest, poppy seeds, and sunflower seeds
Parmesan and cracked black pepper

These are a few combinations I want to try and haven't yet:
Pesto bread: basil, parmesan, pepper, garlic
White chocolate cherry bread: white chocolate chips and dried cherries
Jalepeno and cheddar bread: jarred jalepenoes and sharp cheddar

I hope you enjoy this recipe!  No one will believe that you made it yourself, and only you will know how easy it is!


Wednesday, April 25, 2012

A Morning Without Coffee is Like Sleep

I remember my very first sip.  I was about 6 or 7 and my mom told me, "You are not going to like it."  I took the cup, held it to my lips, breathed in deeply, and tasted my first coffee.  I was the type of child, when told they will not like something, it becomes their mission to prove you wrong, so needless to say, I entered a life-long love affair.

One problem I had were those long, hot summer months, which usually ranged from early May to around the end of October.  I wanted my coffee everyday, but those stifling, humid days made it not quite as pleasant.  I loved getting those crisp iced coffees from the local coffee shops, but this practice became time consuming, as well as not very cost effective.  I thought it was a conundrum I would have to deal with, and bear it with stoic acceptance.

But earlier this year, I stumbled across this recipe on the Pioneer Woman's blog, and it has become a staple in our house ever since.  


Put 1 lb of your favorite coffee grounds in a bowl.  


My anticipation is building!


Pour 12-16 cups of water over the grounds.  Use closer to the 12 cups if you want your coffee stronger or closer to 16 if you want it more mellow


Stir the mixture so that every coffee ground is covered with water.  This is about the time my husband comes into the kitchen and says in his most red neck voice, "So yur makin that swamp watter agin?"  


Cover the mixture and let it sit for atleast 8 hours.  I usually let it sit overnight and strain it in the morning.


Now this is the tricky part!  Trust me, they have a lot of easier ways of doing this, but this is my normal method for straining the coffee concentrate.  I take a large bowl with a spout and place it in the bottom of my clean sink.


Place my colander over the bowl


Line my colander with paper towels going in different directions to trap all of those coffee grounds.


Take your coffee concentrate that has been marinating for 8 hours...


And pour it in the middle of the paper towels.  I have used several different tools to strain the coffee, but nothing has worked as well as the paper towels.  With the other things I have used, I always ended up with some of the smaller grounds swimming in the final product, and it makes the concentrate too bitter.


Ta Da!!!!  Perfect!  Pour the concentrate into a pitcher with a lid, and it will last you a whole month!  

I don't have a picture of it, but I can easily lift the paper towels with the coffee grounds out of the colander and place it directly in my garbage can.  I have also heard that you can use the grounds as fertilizer for your garden, but this I have not tried!  If you are interested in this ecofriendly option, I found a link showing you how it is done: http://sustainablog.blogspot.com/2011/01/title-fertilizing-lawns-with-coffee.html


Now we get to reap the benefits of all of our hard work.  We use Monin syrups to sweeten our coffee.  They can be found at your local Cups coffee shop or you can find them online at Monin.com.  You can also use, sugar, honey, or any low calorie sweetener you have on hand.


Fill your cup with ice


Pour the coffee concentrate until the cup is half full, not half empty.  We are remaining positive here! (My cup is alittle more than half full because I like it slightly stronger)


This step is up to you.  The Pioneer Woman says to use heavy cream to fill up the rest of the cup.  Remember, Ree, I am drinking this every single morning without fail... my waist-line cannot handle half a cup of heavy cream everyday!  But to each his own.  You can use heavy cream, half and half, skim milk, whole milk, creamer... I use whatever I have on hand which is normally 1%, and it is still fabulous!


This is the finished product.  I pop on a tervis tumbler lid, and I am out the door and headed to class.  Just ask anyone in my class if they have seen me walk in without this in my hand.  They will say, "No!"  Just ask them if they want to see me if I did not have this in my hand.  They will without a doubt say, "Noooo!"